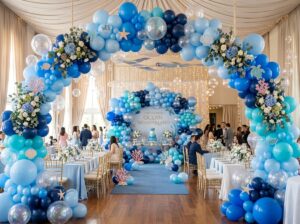
Did you know that over a third of households are currently renting? That is a whole lot of us staring at boring builder-grade beige walls! I remember moving into my first apartment and feeling totally stuck. You really don’t have to live in a blank box just because your name isn’t on the mortgage. Today, we are going to dive into 7 living room designs for renters that will totally change your vibe. Let’s fix up that space!

1. Peel-and-Stick Wallpaper Magic

I remember the first time I tried to cover up some really ugly, scratched-up green paint in a living room I was renting. I was so worried about losing my security deposit! I finally decided to buy a few rolls of peel-and-stick wallpaper to hide the mess. Me and a friend struggled for a good hour just trying to line up the big floral pattern. We actually messed up a whole roll cause the sticky sides folded and stuck together. It was frustrating at first!
But once we figured it out, it was absolute magic. It completely changed the whole room without a drop of paint. Out of all 7 living room designs for renters, this is absolutely the best way to make a big impact fast.
If you want to try temporary wallpaper in your apartment, here is how you do it right so it looks professional:
- Prep your walls: You have to clean the wall first. Just wipe it down good with a damp soapy cloth and let it dry completely. If you leave dust on the wall, the adhesive will fail and your paper will fall down in a few days.
- Order extra paper: Always buy about 15% more wallpaper than the measurements say you need. You are gonna make mistakes when you cut around the light switches and outlets.
- Use the right tools: Don’t just use your hands to press it down. Get a cheap plastic smoothing tool (a squeegee) to push out all the trapped air bubbles as you stick it to the wall.
- Start from the top: Line up the top edge of your wall perfectly straight, and slowly peel the backing off as you work your way down.
When your lease is up and it is time to move, you literally just grab a top corner and slowly pull it down. It comes right off in big strips and doesn’t pull the paint off with it. Your landlord won’t even know it was there!
2. Strategic Area Rug Placements

One of the biggest bummers about renting is having to live with floor tile or carpet that you just hate. In my last place, the living room had this really old, stained grey carpet that made the whole house feel kind of dirty no matter how much I vacuumed. I couldn’t exactly rip it up, so I started looking into big area rugs.
Rugs are honestly a lifesaver for 7 living room designs for renters because they cover up the ugly stuff and make the room feel way more like “you.” Plus, if you have a downstairs neighbor, they will definitely appreciate the extra padding muffling your footsteps!
If you’re trying to fix your floors without a renovation, keep these tips in mind:
- Go big or go home: A common mistake is buying a rug that is too small. It makes the room look tiny and awkward. You want a rug large enough so that at least the front legs of all your furniture—sofa, chairs, and side tables—sit on top of it.
- Layer your rugs: If you have a huge space and can’t afford a giant fancy rug, buy a large, cheap jute or sisal rug for the base. Then, put a smaller, prettier patterned rug right on top of it. It looks super high-end and cozy.
- Use a rug pad: This is really important! Even if you are putting a rug over carpet, use a non-slip pad. It prevents the rug from bunching up and tripping you, and it protects the rental floor from the rough backing of the rug.
- Define your zones: If you live in a studio or have a big open living-dining area, rugs help tell your brain where the “living room” ends and the “kitchen” starts.
I ended up getting a huge Moroccan-style rug that covered almost the whole floor, and it completely hid that gross carpet. When I moved out, I just rolled it up and took it with me to my next house. It was way easier than trying to get a carpet cleaner to fix those old stains!
3. Statement Lighting Without Hardwiring

Lighting is probably the biggest mood-killer in a rental. I once lived in a place that had these harsh, flickering overhead lights that made the whole living room look like a hospital waiting room. It was so depressing! But because I didn’t own the place, I couldn’t just hire an electrician to tear into the ceiling and add fancy dimmers or new fixtures.
I figured out a few tricks to get around this without breaking my lease. Adding your own lighting is one of the smartest of the 7 living room designs for renters because it literally changes how you see the space.
Here is how I fixed the “scary hospital” vibe in my apartment:
- Plug-in wall sconces: You can find really pretty ones that just screw into the wall like a picture frame. The cord hangs down, but you can hide it with a decorative cord cover. No wiring needed!
- Arc floor lamps: If you don’t have an overhead light over your coffee table, get a large arc lamp. It curves way out over the furniture and mimics the look of a high-end ceiling fixture.
- Smart bulbs are your best friend: I put smart bulbs in every single lamp. I can turn them all off from my phone and, more importantly, I can dim them. Lowering the light at night makes even a cheap apartment feel like a luxury hotel.
- Battery-operated puck lights: I actually used industrial-strength mounting tape to put these inside decorative light fixtures that weren’t even plugged in. It’s a great way to get a “glow” on a shelf without any wires at all.
When it’s time to move, you just unscrew the lamps and take them with you. I always keep the original “boob lights” or ugly shades the landlord had in a box in the closet. That way, I can put them back on right before the final walkthrough.
4. Modular Furniture for Awkward Layouts

If you’ve ever tried to move a massive, one-piece sofa into a third-floor walk-up, you know the struggle is real. I once bought this gorgeous velvet couch on sale, but when the delivery guys showed up, it wouldn’t even fit through the front door of my apartment! I had to send it back and pay a huge restocking fee. It was such a bummer.
After that, I became a total convert to modular furniture. It is seriously one of the best 7 living room designs for renters because it grows and changes with you. Most rentals have weird layouts—maybe a radiator is in the way or the living room is super narrow. Modular pieces let you play Tetris with your furniture until it actually fits.
Here is why you should look for modular pieces for your next place:
- Easy moving: Since the sofa comes in separate boxes or “modules,” you can actually fit them in an elevator or around a tight corner in a hallway.
- Total flexibility: If your next apartment has the TV on the opposite wall, you can just move the “chaise” part of your sectional to the other side. You don’t have to buy a whole new set.
- Extra seating: During parties, I sometimes pull the middle section out of my sofa and use it as an extra padded chair. It’s a lifesaver when you have more guests than space.
- Scalability: Start with a two-seater if you’re in a tiny studio. When you move to a bigger place, you can just buy two more middle pieces to make it a giant pit sofa.
I finally settled on a neutral grey modular sectional, and it has lived in three different apartments with me so far. In one place, it was an L-shape, and in my current spot, it’s just one long line. It makes the space feel like it was made for the furniture, instead of the other way around.
5. Maximizing Vertical Space with Leaning Bookshelves

I’ll admit it—I used to be a floor-clutterer. In my first tiny apartment, I had stacks of books and magazines everywhere because I was terrified of drilling holes in the walls and losing my security deposit. Then I discovered leaning bookshelves, and honestly, it changed my life and my living room. It is one of the smartest 7 living room designs for renters because it uses that “dead” air space near the ceiling.
Leaning shelves are great because they just rest against the wall. You don’t need a drill, and they look way more “designer” than those cheap, boxy shelves from the big-box stores. I once bought a really tall ladder shelf and was so worried it would just slide down and crash into my TV. It didn’t, but I did learn a few tricks to make sure they stay put and look awesome.
Tips for Styling Vertical Shelves
First off, please don’t just cram books onto every inch of the shelf. It makes the room feel heavy and cluttered. Mix in some decorative objects like small vases, cool rocks, or even some framed photos.
I also love putting a trailing plant, like a Pothos, on the very top shelf. The vines hang down and make the whole setup look like a professional display. Just make sure you use a little bit of museum wax on the feet of the shelf if you have slippery hardwood floors. It keeps the shelf from scooting out if you accidentally bump into it.
Why Verticality Matters
When you draw the eye upward, a small apartment suddenly feels like it has 10-foot ceilings. Most renters forget about the top half of their walls! By using tall, leaning furniture, you create a focal point that isn’t just the television.
I’ve moved my leaning shelf to three different apartments now, and it’s fit in every single one. It’s a lot easier than patching fifty holes from floating shelves when you move out. Plus, it gives you a place to hide your router and messy cables behind a few well-placed books.
6. Art Gallery Walls Using Command Strips

I used to have so much anxiety about hanging art. I’d stand there with a hammer and a nail, staring at my white rental walls, terrified that I’d make a mistake and end up with a dozen tiny holes to patch up later. For a long time, I just left my favorite prints in a box under the bed. It made my living room feel so temporary and cold.
Then I discovered the magic of heavy-duty Command Strips. They are a total lifesaver for 7 living room designs for renters because they let you go wild with a gallery wall without any permanent damage. Now, my living room is covered in art, and it finally feels like my home.
If you want to build a gallery wall that stays up, here are my best tips:
- Clean the spot first: This is the most important step! Wipe the wall with rubbing alcohol where the strip will go. If there is any dust or oil, the strip will eventually peel off and your frame will crash down in the middle of the night.
- Check the weight: Always look at the package to see how many pounds the strips can hold. If you have a heavy wooden frame, use more strips than you think you need just to be safe.
- Plan it out on the floor: Don’t just start sticking things to the wall. Lay all your frames out on the rug first until you like the arrangement. I usually take a photo of the layout on my phone so I don’t forget it.
- Wait before hanging: Once you stick the strips to the wall, wait about an hour before you actually attach the heavy frames. It gives the adhesive time to really bond.
The best part? When I moved last summer, I just pulled the little tabs down, and they snapped right off. No holes, no sanding, and I got my full deposit back. It’s such a relief not to worry about “decorating sins” when you’re just trying to make a space look nice.
7. Indoor Jungle: Using Plants as Decor
I used to be the person who could kill a plastic cactus. Seriously, I had no green thumb at all! But when I moved into a rental with a really awkward, empty corner by the heater, I decided to try one big Monstera plant to fill the gap. It felt so much better than buying another piece of cheap furniture. Adding life to your space is one of the most rewarding of the 7 living room designs for renters because plants don’t care who owns the walls—they just want some sun!
Now, my living room looks like a total indoor jungle, and it makes the air feel so much fresher. If you’re worried about your lease, plants are the perfect decor because they don’t require any holes in the walls and they move with you.
Here is how I suggest starting your rental garden:
- Start with “unkillable” plants: If you’re a beginner, get a Snake Plant or a Pothos. They can handle a bit of neglect and don’t need perfect light to look great.
- Vary the heights: To make it look like a “design” and not just a bunch of pots on the floor, use plant stands. Put some on the floor, some on your leaning shelves, and maybe one trailing off the top of the fridge.
- Use pretty pots to hide the plastic: Don’t worry about repotting everything immediately. Just buy a beautiful ceramic or wicker “cachepot” and drop the nursery’s plastic pot right inside it. It’s way cleaner and easier.
- Grouping in threes: For some reason, plants look better in groups. I like to put a tall palm, a medium leafy plant, and a small succulent together in a corner. It creates a little “moment” in the room.
My plants have become my favorite part of my home. When I’m feeling stressed, just watering them helps me relax. Plus, they do a great job of hiding ugly baseboards or weird electrical outlets that I can’t move. When it’s time to move, I just put them in the backseat of my car and they’re the first things I set up in the new place to make it feel like home right away.
Conclusion
Making a rental feel like home takes a little bit of creativity, but it is totally worth it. From slapping up temporary wallpaper to leaning a massive bookshelf against the wall, you’ve got options. I hope these tips help you stop stressing about your landlord and start loving your space! If you loved these ideas, please pin this post on Pinterest to help out your fellow renters!