Did you know the average baby shower can cost upwards of $500? That is wild! I believe welcoming a new life shouldn’t mean emptying your savings account. That is exactly why I’ve gathered 7 baby shower ideas diy that look professionally done but are actually super affordable. From organic balloon arches to custom onesie stations, we are going to transform your space for 2026. Grab your glue gun, because it is time to get crafty and create a day the mom-to-be will never forget!

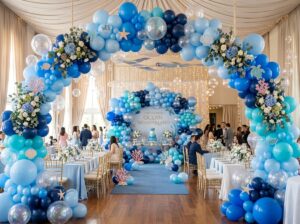
1. The Organic Balloon Garland Arch

Honest truth time? The first time I tried to make a balloon arch, I thought I could just tape balloons to the wall. It was a disaster. Half of them fell down before the mom-to-be even walked in, and I was left standing there with a roll of scotch tape and a bruised ego. I realized then that if I was going to master 7 baby shower ideas diy style, I needed a better plan.
Now, I look back and laugh, but back then? I was sweating. The “organic” look is popular because it’s messy on purpose. That is great for us because you don’t have to be perfect. You just need to be patient.
What You Actually Need
Don’t try to be a hero and blow these up with your mouth. I did that once and got so dizzy I had to sit down for twenty minutes. Buy an electric balloon pump. It costs like twenty bucks and saves your lungs.
You also need a decorating strip. It’s this clear plastic strip with holes in it. You shove the balloon knots through the holes. It does 90% of the work for you. And get glue dots! These are crucial for sticking the tiny balloons into the gaps later.
Creating the “Organic” Look
The secret is variety. You can’t just use standard 11-inch balloons. You need the big 18-inch ones and the tiny 5-inch ones too.
Here is my trick: blow them up to different sizes. Don’t make them all round balls. Some should be a bit under-inflated. It gives it that flowing, professional vibe we want. I usually start by stuffing the strip with the medium and large balloons first. It looks weird at first, like a sad caterpillar. Just trust the process.
Hanging the Beast
This is where people mess up. Do not use tape. Use heavy-duty Command hooks. Put them on the wall an hour before you hang the garland so they really stick.
I use fishing line or curling ribbon to tie the balloon strip to the hooks. Once it’s up, that is when you use the glue dots. Take the tiny 5-inch balloons and stick them into any holes or gaps you see. It hides the plastic strip and makes the whole thing look full and expensive.
I’ve done this for three showers now. It takes time, maybe two hours, but it saves hundreds of dollars. Plus, everyone thinks you hired a pro. And frankly, that feeling is worth every popped balloon.
2. DIY “Baby” Wooden Block Letters

I remember walking through a high-end craft store and seeing these gorgeous, floral-filled letters spelling out a baby’s name. They were stunning. Then I flipped the price tag over and nearly choked on my coffee. They wanted fifty dollars per letter! For cardboard! I knew right then that this had to be one of my 7 baby shower ideas diy projects because there was no way I was paying that.
It turns out, making these yourself is incredibly satisfying. It gives the gift table or entry table a focal point that looks custom-made. Plus, the mom-to-be can take them home for the nursery afterwards, which is a huge bonus.
Picking Your Base
You have two main choices here: wood or cardboard. I usually go with the hollow cardboard letters you find at the craft store (often called papier-mâché letters). They are super light and easy to cut into. Wood is sturdier, but if you want to fill them with flowers, you have to find the hollow kind, which can be harder to hunt down.
If you just want to paint them, solid wood is fine. But for that lush, floral look? Go with the cardboard. I grab them when they are on sale. Seriously, never pay full price for these; they go on sale every other week.
The Floral Hack
This is the fun part. You need an X-Acto knife to carefully slice off the top face of the letter. Please be careful! As a teacher, I am always telling kids to cut away from themselves, and I’m telling you the same thing. Once the top is off, you have a hollow tray in the shape of a letter.
I buy cheap floral foam blocks and cut them to fit snugly inside the letter. You don’t need to glue the foam down if it’s a tight fit. Then, take your faux flowers—I get mine from the dollar store or sale bins—and snip the stems short. Poke them right into the foam. You want to pack them in tight so you don’t see the foam underneath. Mixing big blooms like peonies with little filler flowers gives it a really expensive look.
Making Them Stand Tall
Since cardboard letters are light, a gust of wind (or a running toddler) can knock them over. If you are doing this indoors, they usually stand fine on their own. But if you are outside or just worried, I glue a small metal washer or a heavy stone inside the bottom of the letter before I add the foam. It weights it down just enough.
Arranging them is the final touch. I like to put them on the cake table or the gift table. It creates this beautiful background for photos, and honestly, it looks like you spent a fortune. Nobody needs to know you made the whole set for under twenty bucks while watching your favorite show.
3. The Custom Onesie Decorating Station

I have been to plenty of showers where we played silly games, like guessing the baby food flavor. Those can be fun, but honestly? Sometimes you just want to do something with your hands. That is why I absolutely love this idea. It hits two birds with one stone: it is a fun activity for your guests, and the mom-to-be leaves with a whole wardrobe for the little one.
When my sister had her first baby, she called me two weeks in, panicking because she had run out of clean clothes. Babies are messy! They go through three or four outfits a day easily. This station ensures she has plenty of backup options when the laundry pile gets scary.
Setting the Stage
First things first: do not just buy newborn sizes! Everyone loves the tiny clothes because they are cute, but the baby will outgrow them in a month. I always tell people to buy a mix of sizes—0-3 months, 3-6 months, and even some 6-9 months. It is a lifesaver later on.
You have to pre-wash the onesies. I know, it’s an extra step, but it’s important. New clothes have sizing chemicals on them that can irritate a baby’s skin, and washing them helps the fabric markers stick better anyway. I usually grab a few packs of plain white onesies from the big box store. They are cheap and soft.
The Decorating Supplies
Keep it simple. I used to put out puffy paints, but let me tell you, that was a mistake. They take forever to dry and guests end up smearing them. Now, I stick to fabric markers and iron-on patches. They are way less messy.
You absolutely need to put a piece of cardboard inside each onesie before people start drawing. If you don’t, the marker will bleed right through to the back. I just cut up cereal boxes into squares and slide them in. It works perfectly. Also, get some stencils! Not everyone is an artist, and having a stencil helps people feel confident that they aren’t ruining the shirt.
Displaying the Masterpieces
Don’t just fold them up when they are done. Hang them up! I string a piece of twine across the room or along a wall and use wooden clothespins to hang the finished onesies.
It instantly becomes part of the decor. Seeing all those colorful, little outfits hanging in a row is just adorable. It makes for great photos, and the mom-to-be loves looking at the funny messages and cute drawings her friends made. It’s way better than a card that gets thrown away.
4. Elegant Diaper Cake Centerpieces

I have to laugh because at my first baby shower, my grandmother actually tried to cut into the diaper cake. She thought it was fondant! That is how good these things can look if you take your time. But unlike a real cake, this is one of those 7 baby shower ideas diy that doesn’t disappear in five minutes. It sits there looking pretty, and then the parents actually use it.
Diapers are expensive. We all know that. So giving a gift that serves as a centerpiece and saves the parents a late-night run to the store? That is a winner in my book. It looks complicated, but if you can roll a sleeping bag, you can make this.
Choosing Your “Ingredients”
First tip: do not buy newborn diapers. Babies stay in newborn sizes for about five minutes. I always buy Size 1 or Size 2. That way, the cake stays intact for a while as a decoration in the nursery before they need to dismantle it.
Also, look at the design on the diapers. Some brands have bright, loud cartoons on them. That can be cute, but if you want that “elegant” look, try to find diapers that are mostly white or have a soft, subtle pattern. It makes the final product look much cleaner. You will need a big box, probably around 60 to 70 diapers for a three-tier cake.
The Rolling Technique
This is the part that takes patience. You have to roll each diaper up tight. Start from the waist and roll down to the folded edge. Secure each one with a small clear rubber band. I usually sit in front of the TV and do this assembly-line style.
To build the tiers, you need a core. I use an empty paper towel roll or a cheap bottle of baby champagne (or cider) in the middle. Place the bottle in the center and start standing the rolled diapers around it. Use a large rubber band—like the giant ones from the broccoli aisle—to hold the circle of diapers together. Make a big bottom tier, a medium middle tier, and a small top tier.
Hiding the Mechanics
Now you have a pile of diapers held together by rubber bands. It doesn’t look great yet. The magic happens with the ribbon. Get some wide satin or burlap ribbon—at least two inches wide.
Wrap the ribbon around each tier to cover up those giant rubber bands. You can use a little hot glue to stick the ribbon to itself (don’t glue the diapers!). Once the ribbon is on, you can tuck in little extras like travel-sized lotions, pacifiers, or baby spoons between the folds. Top it off with a cute stuffed animal or a pair of baby shoes, and you are done. It’s a showstopper every time.
5. Painted Mason Jar Floral Arrangements

I have a confession to make. I hoard glass jars. Spaghetti sauce jars, pickle jars, jelly jars—you name it, I keep it. My husband drives me crazy asking why we have so much empty glass in the garage, but when it comes time to plan a party, I am the one laughing. These jars are the foundation for one of the easiest 7 baby shower ideas diy projects out there.
If you don’t have a stash like me, that is okay. You can buy a case of mason jars at the store for pretty cheap. But honestly? Just ask your neighbors or friends to save their jars for a month. You will have more than you need, and it’s free.
Getting That Farmhouse Look
You can leave the glass clear, but painting them makes them look like actual decor rather than just old food containers. I always use chalk paint. It sticks to glass way better than regular acrylic paint, and it dries fast.
You don’t need to be careful here. Just slap a coat of paint on the outside. Pastel pinks, blues, or a creamy white look best for baby showers. Once the paint is totally dry, here is the trick: take a piece of sandpaper and scratch it up. Rub the paint off the raised letters, the rim, and a few random spots on the sides. It gives it that rustic, vintage look that is so trendy right now. Plus, it hides any mistakes you made while painting.
The Grocery Store Flower Hack
Do not go to a florist. I repeat, do not go to a florist. They charge way too much for simple arrangements. The morning of the shower, I go to the local grocery store. I look for the “filler” flowers—Baby’s Breath, daisies, or carnations. They are cheap, sturdy, and take up a lot of space.
Because the jars are painted, nobody can see the stems or the water. This is great because you don’t have to worry about arranging the stems perfectly. You just need enough blooms to fluff out over the top. I usually cut the stems short so the flowers sit right on the rim of the jar.
Grouping for Impact
A single jar sitting in the middle of a big table looks sad and lonely. It just doesn’t work. The secret is to group them. I like to put them in clusters of three in the center of round tables. If you have long rectangular tables, line them up down the middle like a runner.
To finish them off, I wrap a piece of rough jute twine around the neck of the jar and tie a simple bow. It covers the threads where the lid would go and adds texture. At the end of the party, I tell the guests to take them home. People love them, and it means I don’t have to haul them back to my garage!
6. Hand-Lettered Chalkboard Welcome Sign

I have to be honest with you. My handwriting looks like a chicken walked through a puddle of ink and then danced across the paper. It is bad. So when I first saw those gorgeous, swirly chalkboard signs on Pinterest, I thought, “Well, I guess I have to hire a calligrapher.” But hiring someone to write on a chalkboard costs money I didn’t want to spend.
That is when I learned the biggest secret in the DIY world: most people are cheating. They aren’t freehanding those signs! Once I figured out how to fake it, this became a staple in my list of 7 baby shower ideas diy. It greets guests right when they walk in and sets the mood instantly.
Ditch the Regular Chalk
If you try to use that dusty white stick chalk from the classroom, you are going to be disappointed. It looks faint and messy. You need to buy “chalk markers” or “liquid chalk.” They are basically paint pens that wipe off with water.
You can find them at any craft store. They come in bright white, pastels, and even gold. The lines come out crisp and solid, which makes your writing look ten times better immediately. Just make sure you shake the pen really well before you start, or you’ll just get watery sadness coming out of the tip.
The “Pencil Transfer” Trick
Here is the cheat code. Go to your computer and type out what you want the sign to say. “Welcome Baby Smith” or “Oh Boy!” are classics. Pick a pretty font that you love. Print it out on regular paper.
Now, flip that paper over. Take a piece of regular chalk and scribble all over the back of the paper where the words are. You want a thick layer of chalk dust on the back. Flip the paper back over and tape it to your chalkboard where you want the words to be.
Take a pencil and trace the outline of the printed letters. Press down hard. When you peel the paper away, you will see a faint white outline of the letters on the chalkboard! It transfers the chalk dust right onto the board. Now, all you have to do is trace over those faint lines with your liquid chalk marker. It is basically coloring by numbers.
Dress It Up
A chalkboard sitting on an easel by itself can look a little plain. It needs accessories. I usually go to the dollar store and grab a strand of fake eucalyptus or ivy. Drape it over the top corner of the frame and let it hang down the side.
If you have leftovers from your balloon arch, tape a little cluster of three balloons to the corner. It ties everything together. When the party is over, you just wipe the board clean with a wet rag, and it is ready for the next birthday or holiday. It’s the decoration that keeps on giving.
7. Homemade Sugar Scrub Party Favors

I have been to so many parties where I get a little bag of plastic junk that ends up in the trash before I even get home. It’s a waste of money for the hostess and a waste of space for me. That is why I started making sugar scrubs. It is one of those 7 baby shower ideas diy projects that people actually use. Plus, it makes your hands feel like soft butter, which is nice.
This project is great because you can make twenty favors in about thirty minutes. It is fast, it is cheap, and it looks like something you bought at a fancy spa store.
The Three-Ingredient Recipe
You do not need to be a chemist to do this. You really only need three things: sugar, oil, and a smell.
I use regular white granulated sugar from the baking aisle. You can use brown sugar if you want a rougher scrub, but white sugar looks prettier if you plan to dye it. For the oil, I always use coconut oil. It is solid at room temperature but melts when you rub it on your skin. If you are allergic to coconut, olive oil or almond oil works too, but they might change the color a bit.
For the scent, just grab an essential oil. Lavender is calm and popular. Lemon is fresh. Just don’t mix them all together or it will smell like a weird soup.
Mixing It Up
Get a big mixing bowl. The ratio is usually two parts sugar to one part oil. So, if you use two cups of sugar, use one cup of oil.
Melt the coconut oil in the microwave first so it is liquid. Pour it over the sugar and stir. You want it to feel like wet sand. If it is too runny, add more sugar. If it is too dry, add more oil.
This is the part where you can get fancy. Add a tiny drop of food coloring—like pink for a girl or blue for a boy. But go easy! You don’t want your guests to have blue hands for a week. A little goes a long way.
Packaging It Up Cute
I buy those little glass jars with the latch lids from the dollar store or online in bulk. They are the perfect size. Spoon the scrub into the jars and wipe the rims clean.
To finish it off, I print out little tags on cardstock. Something simple like “From Mom’s Shower to Your Shower” is always a hit. Punch a hole in the tag, tie it on with some ribbon or twine, and stack them on a silver tray by the door.
Guests grab one on their way out, and I promise you, I get texts the next day asking for the recipe. It is a sweet way to say thank you without spending a fortune.
Conclusion
So there you have it. We made it through all 7 baby shower ideas diy without gluing our fingers together (hopefully). Planning a shower is a lot of work, I know. But when you see the mom-to-be smiling at that diaper cake you rolled by hand, or guests laughing while they paint a onesie, it feels really good.
You saved money, sure. But more importantly, you put your heart into it. That is what people remember long after the cake is eaten.
If you found these tips helpful, please do me a huge favor! Pin this post to your “Baby Shower” board on Pinterest. It helps other people find these ideas, and it helps me keep sharing my favorite projects with you. Good luck with the party—you are going to do great!