Raise your hand if you’ve ever walked into your living room and just felt… blah. I’ve been there! You look around and realize the space that used to bring you joy now feels like a doctor’s waiting room. It’s frustrating, right? But here is the good news: you don’t need a sledgehammer or a lottery win to fix it.
In 2026, home decor is shifting away from stark minimalism and moving toward “cocooning” and personal expression. We want spaces that feel like a warm hug, not a showroom. In this article, I’m going to walk you through 7 room transformation ideas that I have personally tested (and loved). Whether you are renting and need damage-free hacks or you are ready to paint the ceiling, these tips will help you turn that boring box into a sanctuary. Let’s dive in!

1. The Power of Color Drenching

You know, I used to be absolutely terrified of dark paint. I thought if I painted anything other than “Builder’s Beige” or bright white, my house would look like a cave. I remember standing in the paint aisle about five years ago, staring at a swatch of navy blue, and I just chickened out.
I bought a gallon of “safety white” instead. Big mistake. My living room didn’t look airy; it looked like a hospital waiting room that hadn’t been updated since 1998. It felt cold and disjointed because the white walls clashed with my dark furniture.
That is when I stumbled upon color drenching. If you haven’t heard of it, it’s basically taking one color and painting everything—the walls, the baseboards, the window trim, and yes, even the ceiling.
Why You Should Paint the Ceiling
I know what you’re thinking. “Paint the ceiling? Are you crazy?” I thought the same thing. But here is the thing: when you have white trim and a white ceiling against a colored wall, your eye stops at every line. It creates visual clutter.
When you drench the room in one color, those lines disappear. It actually makes a small room feel bigger because you can’t tell where the wall ends and the ceiling begins. It’s like being wrapped in a cozy blanket.
In 2026, we are seeing a lot of people ditching the gray and going for moody, warm tones. I just helped my sister paint her powder room in a deep aubergine (purple-brown), and it is stunning.
The Secret is in the Sheen
Here is a trick I learned the hard way. While you use the same color paint, you shouldn’t use the same finish everywhere. If you do, it might look a bit flat.
For the walls and ceiling, I usually stick to a matte or flat finish. It hides imperfections in the drywall (and let’s be honest, my drywall skills are average at best).
But for the trim, baseboards, and doors, I get the paint store to mix the exact same color code in a satin or semi-gloss finish. This subtle difference catches the light just enough to add texture without breaking that seamless look.
It’s Easier Than You Think
The best part? You don’t have to be a pro to do this. You don’t need to spend hours taping off the trim because—guess what—you’re painting the trim the same color! It saves so much time.
If you are renting, this might be tricky unless your landlord is cool. But if you own your place, give it a shot in a small room first, like a bathroom or an office. It’s a total game-changer.
Just grab a sample pot first. Paint looks different in your house than it does under the fluorescent lights of the hardware store. Trust me, you don’t want to end up with “Barney Purple” when you wanted “Mood Indigo.”
2. Layer Your Lighting (Kill the “Big Light”)

If there is one thing that drives me crazy, it is the “Big Light.” You know the one I’m talking about—that single ceiling fixture in the middle of the room that floods everything with harsh, flat brightness.
I remember coming home from teaching all day, exhausted, and flipping that switch. My living room instantly looked like a cafeteria. It was glaring and unflattering. I looked in the mirror one time with that light on and saw wrinkles I didn’t even know I had!
The fix isn’t to buy a more expensive chandelier. The secret is to stop using that overhead light altogether and start layering your lighting. This is how hotels make their rooms feel so relaxing, and it is pretty easy to copy.
The Three Layers You Need
To get this right, you just need to think about light in three different buckets. I explain this to my friends all the time, and it always clicks for them:
- Ambient Lighting: This is your base layer. Instead of the ceiling light, use a couple of floor lamps or table lamps to create a soft, general glow.
- Task Lighting: This is light for doing specific stuff. Think of a reading lamp next to your armchair or a strip of lights under your kitchen cabinets so you can see while you chop veggies.
- Accent Lighting: This is the fun part. It’s light used to highlight something special, like a small picture light over a painting or a candle on a shelf.
Get Smart About Bulbs
Another thing I learned the hard way is that the color of the light bulb matters a lot. I once bought “Daylight” bulbs for my bedroom, and it felt like I was trying to sleep in a hospital.
For living rooms and bedrooms, you want “Warm White” bulbs (usually around 2700K on the box). They give off that golden, cozy vibe.
If you can, grab some smart bulbs. I finally got a couple last year. I have them set up so they automatically get dimmer and warmer as it gets later in the evening. It helps my brain figure out it’s time to sleep. Plus, you can change the mood without getting off the couch, which is a huge plus in my book.
So, do yourself a favor: turn off the big light tonight. Turn on a lamp instead. You’ll feel the difference right away.
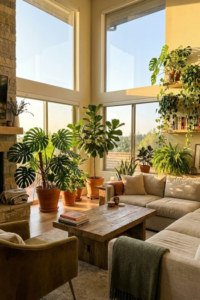
3. Embrace Biophilic Design (Bring the Outside In)

“Biophilic design” sounds like a big, fancy science word. The first time I heard it, I rolled my eyes. I thought it meant turning my living room into a greenhouse. And honestly, I have a “black thumb.” I once killed a cactus. A cactus!
But I learned that this idea is actually pretty simple. It just means bringing bits of nature inside to help you relax. It turns out, our brains are happier when we see wood, stone, and green stuff.
It’s Not Just About Houseplants
You don’t need a nursery in your corner. In fact, if you are like me and forget to water things, you can skip the potted plants entirely.
Instead, think about materials. I swapped out a shiny plastic side table for a raw wood stump I found at a flea market. It instantly warmed up the room. Using things like wicker baskets, jute rugs, or stone coasters counts too. It adds texture that feels real, not manufactured.
The “Free” Decor Hack
Here is my favorite trick, and it costs zero dollars. Go for a walk. Seriously.
I walk my dog in the park every morning. Last fall, I found a huge branch that had fallen off an oak tree. I dragged it home (my neighbors probably thought I was nuts), washed it off, and stuck it in a heavy vase. It looked sculptural and amazing, way better than anything I could buy at a store.
You can do this with rocks in a bowl or seashells in a jar. It grounds the space. In 2026, we are all craving that “real” feeling because so much of our life is on screens. Bringing a bit of the outside in helps balance that out.
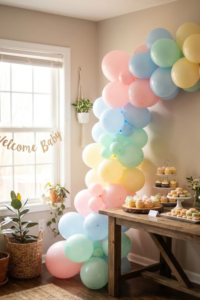
4. Curate a “Collected” Gallery Wall

I have a confession. For years, I had those generic prints from the big box store. You know the ones—maybe a black and white picture of a bridge in a city I’ve never visited. It filled the space, but it didn’t mean anything to me.
The trend in 2026 is moving away from that perfect, matched look. We call it “Collected not Curated.” It basically means your wall should look like you built it over time, not like you bought a “gallery wall kit” in a bag.
Mix It Up
Don’t be afraid to mix weird stuff together. On my hallway wall, I have a fancy oil painting I found at a thrift store right next to a crayon drawing my nephew made for me. I also have a black and white photo of my grandmother.
The mix of old gold frames and simple black ones makes it look interesting. If everything matches perfectly, it can look a bit boring.
The Paper Trick (A Wall Saver)
Putting a bunch of holes in your wall is scary. I used to just guess and hammer a nail in, and I ended up with a wall that looked like Swiss cheese.
Now, I do this trick: I trace every frame onto a piece of newspaper or wrapping paper. I cut those paper shapes out and tape them to the wall with painter’s tape. I can move the paper around a hundred times until it looks right. Once I’m happy, I hammer the nail right through the paper. It saves so much frustration.
Or, Go Big
If a gallery wall feels like too much work (and sometimes it is), just get one giant piece of art. I’m seeing this everywhere lately. One huge canvas takes up a lot of visual space and makes the room feel calm. You can even make your own if you’re feeling crafty—just paint a big canvas with two colors that match your room. It’s easier than you think.
5. Textural Overload (The “Cocoon” Effect)

I used to think decorating was just about matching colors. I’d pick a blue pillow to match the blue curtains and call it a day. But then I sat on my friend’s couch last winter, and I honestly didn’t want to get up. It wasn’t just the color; it was the feel of everything.
We are calling this the “Cocoon” effect now. The world is loud and busy, right? So when we get home, we want to feel safe and soft. Like we are wrapped up in a warm blanket.
Swap the Flat for the Fuzzy
Take a look at your throw pillows. If they are just plain flat cotton, they might be boring. I started swapping mine out for things with more “oomph.”
I bought a couple of those boucle pillows—you know, the ones that look bumpy like a sheep’s coat. I also got a chunky knit blanket. It adds instant warmth. You don’t have to buy a new sofa; just covering it with different textures makes it look expensive and cozy.
Layer Your Rugs
This is a trick I was skeptical about at first. Putting a rug… on top of another rug? It sounded messy to me. But my living room floor is tile, and it gets freezing.
I put down a big, cheap jute rug (that scratchy, natural brown stuff) to cover the main space. Then, I put a smaller, softer vintage-style rug right in the middle under the coffee table. It looks really stylish, like something from a magazine. Plus, my feet are much happier.
Don’t worry about things matching perfectly. Mixing velvet, wool, and wood makes the room feel lived-in. If everything is shiny and smooth, it feels like a museum. We want a home.
6. Zoning with Furniture Layouts

Okay, look at your living room right now. Is all your furniture pushed up against the walls? Like you are afraid the sofa is going to get in trouble if it steps into the center of the room?
I used to do this too. I thought it made the room look bigger. But actually, it just leaves this big, awkward empty space in the middle. It ends up looking like a dance floor that nobody is using.
Float Your Furniture
This was the hardest habit for me to break. I felt like I was wasting space if I pulled the couch away from the wall. But when I finally tried “floating” my sofa—just moving it a few feet into the room—it changed everything.
Suddenly, the room felt cozy. It created a clear pathway behind the sofa to walk through, which actually makes the traffic flow better. You don’t have to shimmy past the coffee table anymore.
Create Conversation Circles
When furniture is all against the walls, you have to shout across the room to talk to someone. Not great.
Try to group your seating together. I put two armchairs facing my sofa, with a rug connecting them. Now, when friends come over, we can actually hear each other. It creates a little “zone” for talking. It feels intimate, not like we are sitting in a bus station.
Define Zones with Rugs
If you have a big open room (or an apartment where the living room is also the dining room and the office), this is key. Use rugs to show where one “room” ends and the next one starts.
I have a desk in the corner of my living room. Before, it looked like clutter. I put a small round rug under the chair and faced the desk into the room (instead of staring at the wall). Now, it looks like a deliberate little office nook. It separates work from relaxing, even though it is just five feet away.
Give it a try. Pull that chair out of the corner. It might feel weird for a day, but I bet you’ll like it.
7. The “No-Reno” Hardware Swap

I admit it, I used to hate my kitchen. But I’m a teacher, not a millionaire, so gutting it and starting over wasn’t going to happen. The cabinets were okay, I guess, but the whole room just felt… tired.
Then a friend told me that hardware is like the “jewelry” of a room. You don’t need to buy a whole new outfit to look dressed up; you just need to put on some nice earrings.
The Easiest Fix
I went online and bought a pack of brass handles. I borrowed a screwdriver (I didn’t even own a drill back then!) and spent a Saturday morning swapping out the old, rusty silver ones.
I can’t tell you how much of a difference it made. It looked like I had spent thousands on a renovation, but I really only spent about $50. It’s the kind of small detail that tricks your brain into thinking the whole space is nicer than it is.
Renters, Listen Up
If you are renting, this is the best hack for you. Just unscrew the landlord’s boring knobs and put them in a Ziploc bag. Label it “Kitchen Stuff” so you don’t lose them.
Put your fancy new knobs on. Then, when you move out, just swap them back. You take your investment with you to the next place. No damage done, and you get your deposit back.
Don’t Be Afraid to Mix Metals
I grew up thinking that if the faucet is silver, the light fixture has to be silver too. But in 2026, that rule is gone.
In my bathroom, I have a matte black faucet, but I used unlacquered brass knobs on the vanity. The mix makes it look cool and modern. If everything matches perfectly, it looks a little bit like a showroom.
The Switch Plate Trick
Here is one last secret. Look at your light switch. Is it a cheap, yellowing plastic square? Yeah, mine was too.
I swapped mine out for a simple brass cover. It took two minutes. It’s such a tiny thing, but every time I flip the switch, I feel a little bit fancy. It’s those little moments that make a house feel good.
Conclusion
So, are you ready to pick up a paintbrush or rearrange that sofa? Transforming a room doesn’t have to mean tearing down the drywall or spending your life savings.
As we move through 2026, the best room transformation ideas are the ones that make your home feel more like you. Whether you try color drenching your bedroom or just swap out some cabinet knobs in the kitchen, these small changes add up to a massive impact.
My advice? Start with just one idea from this list this weekend. Maybe just move the sofa away from the wall and see how it feels. I promise you will be amazed at the difference.
Love these ideas? Save this article to your “Home Decor 2026” board on Pinterest so you can find it later!