Welcome to Your Dreamy Bedroom Revamp!
Hey there, fellow home lovers! I’m Youssef, and I’ve spent more hours than I’d like to admit staring at my bedroom walls, wishing they looked like a high-end boutique hotel. Did you know that we spend about one-third of our lives in bed? That is a massive chunk of time to spend in a room that doesn’t make your heart sing!
I remember once trying to “spruce things up” by painting my dresser a neon green—it was a total disaster and looked like a radioactive lime. But hey, that’s how we learn, right? Today, I’m sharing 7 DIY bedroom ideas that are actually stylish and won’t make you regret your life choices. Let’s dive into some cozy vibes and smart hacks to make your room the ultimate 2026 retreat!

1. The Magic of a Custom Wood Slat Headboard

I’m telling you, nothing changes a room faster than a big, chunky wood feature. When I did my first slat headboard, I was scared I’d mess up the wall. But honestly? It was way easier than I thought it would be. I used to think you needed a huge workshop for this kind of stuff, but you don’t. You just need a bit of patience and maybe a friend to hold the slats while you screw them in. My bedroom used to look like a plain white box, but after a Saturday afternoon of work, it felt like a high-end spa.
Pick the Right Wood for Your Budget
So, here is the thing. You can spend a lot of money on oak or walnut, and it looks great. But if you are watching your wallet, just go with pine. I went to the local hardware store and grabbed a bunch of 1×2 pine boards. They are cheap and they smell like a forest, which is a nice bonus. Just make sure you look at each board to see if it’s straight before you buy it. Some of them are warped like a banana, and that will ruin the whole look. If you find some with a few knots in the wood, that’s fine. It adds character!
How to Put It Together Without a Headache
I started by sanding the boards down really well. You don’t want any splinters when you are trying to sleep or reach for your phone! Then, I stained them a light honey color. To get them on the wall, I didn’t want to drill a hundred holes into my drywall. So, I used a thin piece of plywood as a backing. I glued and nailed the slats to the plywood with about a half-inch gap between each one. I used a small scrap piece of wood as a spacer to keep the gaps even. It makes the whole thing look way more expensive than it actually is.
Why This Project Changes the Vibe
This project is great because it adds vertical lines. If you have low ceilings like I do, those lines make the room feel much taller. Plus, it adds a lot of texture. Before I did this, my room felt cold and empty. The wood adds a warmth that paint just can’t do on its own. I even hid some cheap LED strips behind the top ledge of the wood. It gives a soft glow at night that is perfect for reading. It helps the room feel quieter, too, because the wood helps soak up some of the sound. If you want a project that actually makes a big difference, this is the one to start with.
2. Thrifty Nightstand Makeovers with Cane Webbing

I used to have these plain, boring nightstands that looked like they belonged in a college dorm. I really wanted that high-end boho look, but I didn’t want to spend $400 at a fancy store. That is when I found out about cane webbing. It is basically a mesh made of rattan, and it makes anything look expensive. I went to a local thrift shop and found two sturdy side tables for twenty bucks. They were pretty ugly and had some scratches, but the wood was solid. With a little work, I knew I could turn them into something special.
Prep Your Furniture First
You can’t just slap cane on a drawer and expect it to look good. You have to do the prep work. First, I took the drawers out and removed the old, crusty handles. I sanded the whole thing down because the old finish was peeling and gross. If you are painting, you need to use a primer so the color stays put. I chose a creamy white paint to make the natural wood color of the cane stand out. It took two coats, but it looked much better. One thing to remember: do not paint the parts of the drawer that slide. If you do, they will stick and you’ll be fighting to open your drawer every morning.
The Secret to Working with Cane
This is the part where most people get nervous. Cane webbing is very stiff when it is dry. You have to soak it in a tub of warm water for about 30 minutes before you use it. This makes it soft and easy to move. I cut the cane to fit the middle of my drawer fronts using heavy kitchen scissors. I used a staple gun to attach it to the back of the frame I cut out. As the cane dries, it shrinks and gets really tight. This makes it look like it came from a factory. Just make sure you pull it snug while you are stapling it down.
New Knobs Make a Huge Difference
To finish the look, I bought some matte black knobs. Hardware is like jewelry for your furniture. You could have a great paint job, but old handles will ruin the vibe. The black against the light cane looks very modern for 2026. My friends actually thought I bought a whole new bedroom set! It is a great way to recycle what you already have. You save money and keep old wood out of the trash. Plus, it feels good to see something you fixed yourself every night before you go to sleep.
3. Floor-to-Ceiling “Faux” Built-in Wardrobes

I’ll be honest with you—I am not a professional carpenter by any means. But I do love a good shortcut that makes me look like I know what I’m doing. My bedroom used to be a total mess because I just had one of those flimsy metal racks that always looked cluttered and cheap. I always dreamed of those fancy built-in closets you see in high-end home magazines, but when I called a local shop for a quote, the price was more than what I paid for my first car! That is when I decided to try the “faux” built-in trick using some basic bookshelves I found at a flat-pack furniture store.
Picking the Right Shelves for Your Wall
The first thing I did was measure my wall from the floor to the ceiling. You want to get shelving units that are as tall as possible. I went with the classic Billy bookshelves because they are narrow and easy to move around. I lined up four of them side-by-side against my main wall. At first, they just looked like four bookcases sitting in a row, which wasn’t very impressive. The trick is to anchor them to the wall studs so they don’t tip over. Safety is huge, especially if you have kids or pets running around. Once they are bolted down, they feel much more solid and permanent.
The Magic of Trim and Molding
This is the part where the “magic” happens. To make them look like they were built into the house, I bought some crown molding for the top and some baseboards for the bottom. I nailed the molding across the top of all the units so it touched the ceiling. This hides the gap and makes it look like the wardrobes are holding up the roof! I also used some thin strips of wood to cover the vertical seams where the bookcases meet. I used a little bit of wood filler to hide the nail holes and the gaps. Trust me, once you add that trim, the whole thing starts to look like a million bucks.
Finishing with a Unified Color
The last step is the most important one for making it look high-end. I painted the bookshelves, the trim, and even the wall behind them the exact same color. I went with a soft, muted sage green. Painting everything one color makes the whole unit blend into the room instead of standing out like a sore thumb. It makes the room feel much larger and way more organized. I added some gold handles to the doors I put on the bottom half, and now I have plenty of space for my sweaters and shoes. It took a whole weekend, but it was worth every second to finally have a closet that doesn’t make me want to hide when guests come over.
4. Moody Accent Walls with Picture Frame Molding

I used to think that “fancy” walls were only for old mansions or people with way too much money. My own bedroom walls were just flat and frankly, a bit boring. They didn’t have any soul. One day, I saw a picture of a room with these beautiful rectangular frames on the wall. It looked so classy. I figured out it’s called picture frame molding. It looks like it takes a master carpenter, but I promise you, if you can use a tape measure and a level, you can do this. It’s like adding a 3D effect to your room that makes everything look more expensive than it really is.
Get Your Math Right First
Since I teach for a living, I actually enjoy the measuring part, but I know it drives most people crazy. You can’t just wing it. If your boxes are different sizes or crooked, your whole room will look lopsided. I spent a good hour with a pencil marking where I wanted the “frames” to go. I used painter’s tape to outline the boxes on the wall before I bought any wood. This way, I could see if the boxes were too big or too small compared to my headboard. I aimed for about four inches of space between each box and the edges of the wall. It’s a bit of a workout for your brain, but getting those lines straight is the most important part of the whole job.
Cutting Your Angles Without Stress
You don’t need a big, scary power saw for this project. I used a simple pair of miter shears, which are basically like giant scissors that cut wood at a 45-degree angle. It makes the job so much faster and quieter. I used thin decorative trim from the local hardware store—it’s light and very cheap. To put them up, I used a bit of wood glue on the back and a small brad nailer. If you don’t have a nailer, you can just use tiny finish nails and a hammer. Just be careful not to smash your fingers! I had to fill the corner gaps with a little bit of caulk to make them look smooth.
Picking a Dark, Moody Color
Now, here is my favorite part: the paint. A lot of people are scared to go dark, but in a bedroom, it’s amazing. I chose a deep navy blue that almost looks black at night. I painted the wall, the trim, and even the outlet covers all the same color. This makes the room feel like a cozy cave. It hides any small mistakes you made with the wood, too! When the light hits the molding, it creates these soft shadows that look so elegant. Every time I walk in now, I feel like I’m staying in a boutique hotel, and it only cost me about fifty bucks in wood.
5. Hand-Painted Terracotta “Limewash” Finish

I’ve always loved the look of those old Mediterranean villas where the walls look soft and chalky. It’s a style called limewash, and it makes a room feel like it’s been there for a hundred years. But when I looked up the price of real lime paint, I nearly fell out of my chair! It is so expensive. So, I decided to see if I could get the same look using just regular latex paint and some water. I wanted my bedroom to feel warm and earthy, like a sunset in a desert, so I picked a beautiful terracotta shade.
The Watering Down Trick
The secret to this look isn’t the paint itself, but how you put it on the wall. I took a big bucket and mixed one part paint with one part water. You want it to be pretty runny, almost like heavy cream. I know it sounds scary to put watery paint on your walls, but trust me on this one. I laid down a lot of drop cloths because it can get a bit messy if you aren’t careful. I used a giant, thick brush—the kind you’d see a cartoon character use—and started slapping the paint on in a messy “X” pattern.
Why You Shouldn’t Paint in Straight Lines
If you paint in straight lines like you usually do, this won’t work. You have to be a bit chaotic with your brush. By crossing the strokes over each other, you create different layers of thickness. Some spots stay a bit darker and some look lighter. When it dries, it doesn’t look like a flat wall anymore. It looks like a soft, blurry cloud. I did two coats of this watery mixture, and it turned out better than I hoped. It has this matte, chalky texture that feels so cozy when you are laying in bed.
Making the Room Feel Like a Hug
The reason I love this terracotta color so much is that it completely changes how the light looks in the room. During the day, the sun hits those brush strokes and makes the wall look like it’s moving. At night, with a few lamps on, the room feels like a big warm hug. It is much more interesting than a plain, flat paint job. It gives the room a “soul” without having to buy a single piece of new furniture. Plus, if you mess up, you just paint over it with more watery paint. It’s very forgiving, which is exactly the kind of project I like.
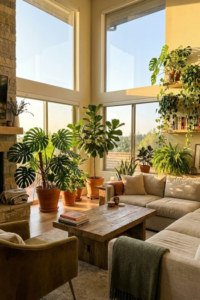
6. DIY Hanging Macramé Plant Corner

I have always loved having plants in my room, but for a long time, it just wasn’t working. I kept putting pots on my dresser or on the floor, and it always felt cluttered. Plus, if you have a cat like mine who thinks every green leaf is a personal salad, you know that keeping plants on the ground is a recipe for disaster. I wanted that lush, green “jungle” look without losing all my surface space. That is when I decided to try making my own macramé hangers. I thought it would be super hard—like trying to learn advanced calculus or something—but it turns out it is mostly just tying knots in a specific order.
Start with the Basic Square Knot
You don’t need a bunch of fancy tools for this project. I just went to the craft store and bought a big spool of cotton cord. The key is to learn the “square knot.” Once you get that down, you can make almost anything. I spent one Sunday afternoon sitting on my bed, practicing with some cord taped to the wall. I messed up a few times and had to untie the whole thing, which was a bit annoying, but eventually, it clicked. It’s actually very relaxing once you get into a rhythm. It’s kind of like knitting but much faster. I made three different hangers of different lengths so the plants wouldn’t all be at the same height. This makes the corner look more interesting and natural.
Finding the Perfect Branch for Hanging
To make the corner look a bit more special, I didn’t just use metal hooks in the ceiling for every single plant. I went for a walk and found a nice, sturdy piece of driftwood. If you can’t find driftwood, a simple wooden dowel from the hardware shop works just as well. I hung the branch from two sturdy hooks in the ceiling using some leftover cord and then draped my macramé hangers over the branch. This lets me group four or five plants together in one corner. I chose trailing plants like Pothos and Heartleaf Philodendron because they grow fast and start to hang down over the cords. It creates this beautiful “curtain” of green that feels so peaceful.
Why Vertical Greenery is a Game Changer
The best thing about this DIY is how much space it saves. My bedroom isn’t huge, so getting the plants off the floor made the whole room feel much lighter. It also keeps the plants closer to the window light where they are much happier and grow faster. I noticed that waking up in a room full of greenery actually makes me feel a bit more energized in the morning. It’s a very cheap way to add a lot of life to a boring corner. Just make sure your hooks are screwed into a ceiling joist so the whole thing doesn’t come crashing down in the middle of the night! That was a mistake I almost made, but luckily I checked for the stud before I hung the heavy pots.
7. Custom Fabric-Wrapped Window Valances

My windows were always a bit of a problem for me. I had these nice linen curtains, but the rods were just cheap white metal ones from a big box store. They looked fine, I guess, but they didn’t have that finished, polished look you see in high-end design magazines. I wanted something that looked solid and built-in, but I definitely didn’t want to spend a fortune on custom window treatments. That is when I discovered the DIY fabric-wrapped valance. It’s basically a fancy box that sits over your curtain rod, and it is a total game changer for making a bedroom look more put together.
Building the Box Without Power Tools
You don’t need to be a pro to make the frame. I actually used foam core board for my first one because it’s so light and easy to cut with a utility knife. If you want something more durable, you can use thin plywood, but foam core is great for beginners. I measured the width of my window and added about two inches on each side so the box would clear the curtains. I cut a long front piece and two small side pieces that go back to the wall. I just used heavy-duty packing tape to join them together. It feels a bit like making a giant shoebox, but once it’s covered in fabric, nobody will know it’s just foam and tape underneath!
Wrapping It Like a Present
This is the fun part where you get to pick your fabric. I chose a soft blue linen to match my bedding. You want a fabric that is thick enough so you can’t see the tape or the foam through it. I laid the fabric face down on the floor, put my box on top, and started wrapping. It is just like wrapping a birthday gift. I used a hot glue gun to pull the fabric tight and stick it to the inside of the box. The corners are the trickiest part, but if you fold them neatly like a “hospital corner” on a bed, they look very professional. Just take your time and don’t burn your fingers with the glue!
Hanging the Valance with Ease
To get it on the wall, I used simple L-brackets. I screwed the brackets into the wall above the window frame and then just rested the valance on top. You can add a little bit of Velcro to the top of the bracket and the inside of the box so it doesn’t slide around. It hides the top of the curtains and the rod perfectly. It makes the window look taller and much more expensive. Plus, it blocks out that little bit of light that usually leaks out from the top of the curtains, which helps me sleep better on Sunday mornings. It’s a small project that makes a massive impact on how the whole room feels.
Wrap Up Your Weekend Project
Updating your bedroom doesn’t have to be a massive headache or a drain on your wallet. From the warmth of a wood slat headboard to the classy look of picture frame molding, we’ve covered a lot of ground today. We looked at how to upcycle nightstands with cane webbing, create faux built-ins with simple shelves, and even how to add “cloud-like” texture with a terracotta limewash finish. Don’t forget those finishing touches like a macramé plant corner and custom window valances to really tie the space together.
These 7 DIY bedroom ideas are all about making your space feel like you. I really hope these tips help you create a cozy spot where you actually enjoy waking up. Whether you tackle one project or all seven, the goal is to create a sanctuary that makes you happy.
Love these ideas? Hover over your favorite image and Pin it to your Pinterest “Dream Home” board to save for later! Sharing is caring!