Did you know the average bathroom remodel in 2025 cost nearly $11,000? That is a lot of money! But here’s the secret designers don’t always tell you: you don’t need a sledgehammer to get a “new” bathroom. Honestly, I’ve seen spaces completely transformed just by swapping out the “jewelry” of the room. It’s wild what a little creativity and fifty bucks can do!
In 2026, we are moving away from sterile, all-white clinical looks and diving headfirst into “spa-like serenity” and earthy warmth. We want our bathrooms to feel like a retreat, not a hospital. Whether you’re renting a tiny apartment or looking to refresh a dated powder room, these budget bathroom decor ideas are going to save your wallet and save your style. Let’s dive into the best low-cost, high-impact updates you can do this weekend!

1. The Power of Paint: Earthy Tones & Accents

If there is one thing I have learned after fixing up three different houses on a teacher’s salary, it is this: paint is magic in a can. Seriously, nothing else transforms a room faster or cheaper. When I look at budget bathroom decor, I always start with the walls. You can spend thousands on new tile, or you can spend $50 on a gallon of high-quality paint and get a totally new vibe. In 2026, we are finally done with those cold, clinical grays that made our bathrooms feel like dentist offices. Now, it is all about warmth.
Why Earthy Tones Work Best
I used to be afraid of color. I thought white was the only way to make a small bathroom look clean. Boy, was I wrong. Stark white can actually make a budget bathroom look cheaper because it highlights every flaw in your old tile or worn-out vanity.
Instead, think about colors you see outside. I am talking about “earthy” tones. Think of a soft sage green, a warm sandy beige, or even a deep terracotta if you are feeling brave. These colors make the space feel grounded and spa-like. Last month, I helped my neighbor paint her powder room a deep moss green. Before, it was just a boring white box. After? It felt like a cozy little jewel box. The dark color actually made the corners disappear, making the small room feel bigger, not smaller. It’s a weird trick, but it works.
The Vanity Makeover
Here is a secret: you probably don’t need a new vanity. You just need to paint the one you have. I know, sanding sounds like a pain, but hear me out. If you have one of those standard orange-oak cabinets from the 90s, painting it is a game changer.
I recently painted my own vanity a dark charcoal color to contrast with my new beige walls. It took me a Saturday afternoon. I just gave it a light sanding (you don’t have to go crazy, just scuff it up), wiped it down, and used a good primer. Then came the fun part. Two coats of semi-gloss paint later, and it looked like a custom piece of furniture. It instantly made my cheap white sink look brighter and newer, too.
Don’t Ignore the Ceiling
Most people just paint the ceiling white and call it a day. But if you want your bathroom to look designed, try painting the ceiling the same color as the walls, or just a shade lighter. It wraps you in the color like a warm blanket. In a small bathroom, this blurs the lines where the wall meets the ceiling, which actually makes the ceilings feel higher. It’s a simple trick that costs nothing extra since you already have the paint!
2. Hardware Swap: The “Jewelry” of the Bathroom

I always tell my friends that hardware is like the jewelry of the room. You can wear a simple black dress, but if you add a nice pair of gold earrings, suddenly you look fancy. It is the exact same thing with your bathroom. You can have a basic vanity and standard tile, but if you swap out the handles and knobs for something stylish, the whole room changes. It is one of the easiest budget bathroom decor tricks because you only need a screwdriver and maybe twenty minutes.
Mixing Metals is Totally Okay
For the longest time, I thought everything had to match perfectly. If the faucet was chrome, the lights had to be chrome, and the toilet paper holder had to be chrome. It was kind of boring, honestly. In 2026, those rules are gone. We are mixing metals now and it looks so much better.
I recently updated my guest bath. The faucet was this old shiny chrome that I couldn’t afford to replace yet. But instead of matching it, I bought brushed brass handles for the cabinet. The mix of the cool chrome and the warm brass actually looked intentional and designer. If you are nervous about it, just stick to two metals. Black goes with everything, so matte black handles with a gold light fixture is a safe bet that looks amazing.
The $6 Spray Paint Hack
Now, if buying new hardware is still too much for the budget (and hey, I get it, knobs can be like $8 a piece!), do what I did in my first apartment. Paint them. I am serious.
I took all the ugly dated brass handles off the vanity. I grabbed a cardboard box and poked holes in the bottom with a pen. Then, I stuck the screws of the handles into the holes so the handles were standing up straight. I took a can of matte black spray paint—I think it cost me about six bucks—and gave them a few light coats. Let them dry overnight. When I put them back on, they looked like brand new modern hardware. It is a little messy, but for less than ten dollars, you can’t beat the result.
Texture is Your Friend
If you are buying new, look for “knurled” textures. That is a fancy word for that cross-hatch, bumpy pattern you see on tools sometimes. It catches the light really well and feels heavy in your hand. Heavy hardware feels expensive, even if you bought it in a bulk pack online. I found a pack of ten knurled gold knobs for about thirty dollars last week. It’s a small detail, but when you grab that handle every morning, it just feels nicer than the cheap plastic ones builder’s put in.
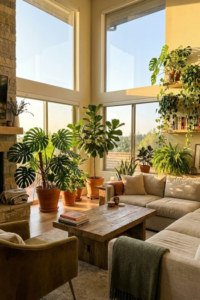
3. Biophilic Bliss: Greenery & Natural Textures

We spend about 90% of our time indoors. I read that statistic recently and it kind of bummed me out. No wonder we all feel a little stressed! That is why “biophilic design” is such a huge trend for 2026. Now, that is just a fancy word designers use for “putting plants in your house.” But honestly, bringing a little bit of nature into the bathroom makes a massive difference. It stops the room from feeling like a sterile science lab and makes it feel like a living, breathing space.
Bringing the Jungle Inside
The best part about decorating with plants is that the bathroom is actually the perfect place for them. Most houseplants, like ferns or pothos, absolutely love humidity. In my living room, I have to mist my plants or they get crispy edges. But in the bathroom? The steam from the shower does all the work for me.
If you are a beginner, start with a Snake Plant or a ZZ plant. I swear, you can forget about them for a month and they will still look happy. I have a big Pothos plant sitting on top of a cabinet in my master bath, and its vines trail down the side. It softens all those hard edges of the mirror and the tile. If you have a bathroom with zero windows (I have been there!), don’t worry. You can use dried elements. A vase of dried lavender or even some cotton stems looks beautiful and adds that natural touch without needing sunlight.
The $5 Spa Trick
Here is my absolute favorite budget bathroom decor hack: the eucalyptus shower bundle. Next time you are at the grocery store (I get mine at Trader Joe’s), grab a bunch of fresh eucalyptus. It usually costs about four or five dollars.
Take a piece of twine or a rubber band and tie the stems together. Then, hang the bundle from your shower head—just make sure it isn’t directly in the water stream. When you take a hot shower, the steam hits the leaves and releases the natural oils. The whole bathroom smells like a fancy spa. It helps clear your sinuses too! It looks pretty and smells expensive, but it costs less than a latte.
Warming It Up with Wood
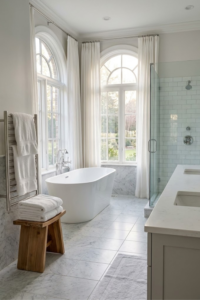
Bathrooms are full of “cold” materials—porcelain toilets, ceramic tiles, metal faucets. To make it feel cozy, you need to balance that out with warm textures. Wood is perfect for this.
You don’t need to redo the floors to get wood in there. I bought a simple bamboo bath mat to put outside my shower, and it instantly made the room feel earthier. Another great addition is a small wooden stool. I found one at a thrift store for $15. I keep it next to the tub with a folded towel and a candle on it. It adds that golden, natural color that makes the white tile look less harsh. It’s all about creating layers so the room feels welcomed.
4. Lighting: From Builder-Grade to Boutique

If you only change one thing in your bathroom, please let it be the lighting. I cannot stress this enough. You can have the most beautiful tile in the world, but if you have bad lighting, the whole room is going to look cheap. And worse, you are going to look tired in the mirror every morning!
Lighting is often the thing builders save money on. They slap up a cheap “bar light” above the mirror and call it a day. But upgrading this is actually one of the most effective budget bathroom decor moves you can make. You don’t need an electrician for everything, either.
The “Color Temperature” Mistake
Before you even touch a fixture, let’s talk about light bulbs. This is the most common mistake I see. People buy “Daylight” bulbs (5000K) thinking they are brighter and better. They aren’t. They are blue and harsh. They make your bathroom feel like a gas station restroom or an operating room.
You need to switch to “Warm White” or “Soft White” bulbs. Look for the number 2700K or 3000K on the box. It gives off a soft, golden glow that mimics candlelight or sunset. It makes your skin look better and makes the whole room feel cozy and expensive. I switched the bulbs in my sister’s rental apartment for about $15, and she thought I had painted the walls a different color. It really changes everything.
Ditch the Hollywood Bar
You know that light strip with the big round bulbs? The one that looks like a cheap dressing room? It has to go. It casts deep shadows under your eyes because the light is coming from above.
If you are handy (and comfortable turning off the breaker!), swapping a light fixture is actually pretty simple. I watched a few online tutorials and changed mine in under an hour. I found a sleek, matte black vanity light on clearance for $40. It instantly modernized the space.
If you can’t mess with the wiring, try adding sconces. Sconces are lights that go on the wall, usually on the sides of the mirror. This is the most flattering light for putting on makeup or shaving because it lights your face evenly. If you can’t hardwire them, they make “puck lights” now that are battery operated. You just glue the sconce to the wall and stick the battery light inside. No wires needed!
Add a Surprise Light
For a real designer touch that costs almost nothing, try adding a light where people don’t expect it. In my powder room, I hung a simple glass pendant light in the corner over the toilet. It sounds weird, but it fills that empty vertical space and adds a nice glow in the corner. I just used a plug-in pendant and hid the cord behind a plant. It cost me maybe $35 for the light and the hook, but it looks like a million bucks.
5. Mirror Magic: Frame It or Float It

The mirror is usually the first thing you look at when you walk into a bathroom. It is the focal point. Yet, in so many homes I visit, the mirror is just a giant, flat sheet of glass glued to the wall with those little clear plastic clips. It screams “builder-grade.” If you want your bathroom to look finished and thoughtful, you have to deal with the mirror. The good news? You don’t always have to rip it off the wall.
The DIY Frame Job
If you are renting or just terrified of breaking seven years of bad luck by removing a huge mirror, frame it right where it sits. This is one of the best budget bathroom decor projects I have ever done. I did this in my master bath last year and it changed the whole room.
I bought some simple pine molding from the hardware store—it cost maybe $30 for the wood. I painted the wood black to match my faucet. Then, using construction adhesive (Liquid Nails is my go-to), I just glued the wood directly onto the mirror around the edges. I used some painter’s tape to hold it in place while it dried. Suddenly, that boring sheet of glass looked like a custom, high-end framed mirror. It took one afternoon and zero power tools besides a saw to cut the corners.
Go Round to Soften the Room
Bathrooms are full of straight lines and hard angles. Square tiles, square vanity, rectangular tub. It can feel a little rigid. That is why I love swapping out a standard medicine cabinet for a round mirror.
A round mirror instantly softens the room. It breaks up all those boxy shapes. You can find beautiful round mirrors with thin black or gold metal frames at discount home stores like HomeGoods or Target for under $50 now. I swapped the rectangle mirror in my half-bath for a round one, and the room felt bigger immediately because the curve draws your eye up and around. Plus, if you hang it by a leather strap or a chain, it adds another layer of texture.
Float It or Lean It
If you have a modern style, you might like the “floating” look. You can buy mounting brackets that push the mirror an inch or two off the wall. Then—and here is the cool part—stick a cheap LED light strip behind it. When you turn it on, the mirror glows around the edges. It looks futuristic and very fancy, like a high-end hotel, but the LED strip is like $15 online.
And if you can’t drill holes in the wall? Lean it. If you have a larger vanity or a shelf, leaning a tall, thin mirror against the wall looks very casual and loft-like. Just make sure you use a little sticky tack or an anchor on the back so it doesn’t slide into the sink!
6. Textile Refresh: Towels, Rugs & Shower Curtains

This is the “instant gratification” step. If you are impatient like me and want to see a change right this second, start here. Textiles—which is just a fancy word for towels, rugs, and curtains—are the soft things that balance out all the hard, cold surfaces in a bathroom. When I first moved into my house, I had a mishmash of towels I had collected since college. Some were blue, some were faded pink, some were bleaching out. It made the whole room look messy, even when it was clean.
The Waffle Weave Upgrade
I am going to tell you the best secret I learned from staying at a nice hotel once: waffle weave towels. You know, the ones with the little square texture? They are amazing. I used to buy those thick, fluffy plush towels, but they took forever to dry and always started smelling a little mildewy after a while.
Waffle weave towels dry super fast because of the texture. Plus, they look incredibly high-end. I swapped all my old towels for a matching set of white waffle ones. I rolled them up and put them on a shelf, and suddenly my bathroom looked organized. Stick to one color—white, grey, or oatmeal. Having matching towels reduces “visual clutter,” which just means your eyes don’t get tired looking at a bunch of different colors.
The “High Curtain” Trick
The shower curtain is usually the biggest thing in the room. It takes up a huge amount of visual space. If you have a standard plastic curtain hanging on a tension rod right above your head, you are missing an opportunity.
Here is the trick: buy an extra-long shower curtain (look for 84 inches or 96 inches long, not the standard 72). Then, move your curtain rod up. Put it almost at the ceiling. When you hang the curtain from that high up, it draws your eye upward and makes your ceilings look way taller. It makes a tiny bathroom feel grand. And please, use a fabric curtain with a plastic liner inside. The fabric adds warmth that plastic just can’t.
Ditch the “Toilet Rug”
Okay, we need to have a tough conversation. You know those fuzzy rugs that are cut into a U-shape to fit around the base of the toilet? Please, let them go. They are outdated and, honestly, kind of hard to keep clean.
In 2026, we are treating the bathroom like any other room in the house. Instead of a “bath mat,” use a small runner rug. I found a vintage-style runner rug at a discount store for $20. It has beautiful reds and blues in it. Putting a “real” rug in the bathroom adds so much character. It feels sophisticated and cozy under your feet. Just make sure you put a non-slip pad underneath it so you don’t go sliding across the tile after a shower!
7. Creative Storage: Floating Shelves & Baskets

Clutter is the absolute enemy of a budget luxury look. You can have the nicest paint job and the fanciest gold hardware, but if you have a half-empty bag of toilet paper sitting on the floor and hair products scattered everywhere, the room is going to feel messy and cheap. I tell my students to keep their desks organized because a clear space helps a clear mind, and the same is true for your bathroom. You need a place for everything that isn’t just “shoved under the sink.”
The “Dead Space” Above the Toilet
In almost every small bathroom I have ever seen, there is a giant empty space on the wall right above the toilet. It is what I call “dead space.” It is just begging to be used.
Installing floating shelves here is a total game changer. You can buy a kit online for about $30, or if you are handy, just buy a piece of lumber, stain it a nice walnut color, and buy some brackets. I put two shelves above the toilet in my guest bath. I use them to hold spare rolls of toilet paper (which actually look kind of nice if you stack them in a pyramid), a small plant, and a nice candle. Suddenly, that blank wall has a purpose. Just make sure you use a stud finder or good wall anchors—you do not want those shelves falling down in the middle of the night!
Hiding the Ugly Stuff
Let’s be real: some bathroom stuff is just ugly. Hair dryers, curling irons, extra shampoo bottles, that giant bottle of mouthwash. You don’t want those out on the counter.
My favorite trick is using woven baskets. I love seagrass or wicker baskets because they add that natural texture we talked about earlier. I bought a set of three matching baskets for under $20 at a discount store. I keep one on the back of the toilet tank to hold extra hand towels, and the larger ones go on the floor or under an open vanity. They hide all the plastic bottles and cords, so all you see is the pretty basket. It keeps the visual “noise” down.
The Glass Jar Trick
This is the cheapest trick in the book, but it makes you look so organized. Get rid of the packaging. Cotton balls come in crinkly plastic bags. Q-tips come in flimsy cardboard boxes. Bath salts come in weird pouches.
Go to the dollar store and buy a few simple glass jars with lids. I think I paid $1.25 for mine. Pour your cotton balls, q-tips, and bath salts into these jars. Arrange them on your new floating shelves or on a tray on the counter. It looks like a display in a fancy hotel spa, but it cost you less than a cup of coffee. It turns everyday boring items into decor.
Ladder Storage
If you are renting and can’t drill holes for shelves or hooks, get a bamboo ladder. You can lean it against the wall and use the rungs to hang your towels. It takes up very little floor space, which is great for tiny bathrooms, and it adds height to the room. Plus, it looks very “Pinterest” without trying too hard.
Conclusion
See? You really don’t need a winning lottery ticket to get a bathroom you love. By focusing on these small details—paint, hardware, lighting, and just getting organized—you can create a space that feels fresh and totally yours. It is amazing what a little bit of creativity and elbow grease can do.
The best part about these budget bathroom decor ideas is that you don’t have to do them all at once. That would be overwhelming! Just pick one thing. Maybe this weekend you swap out the towels. Next month, maybe you brave the paint aisle. It is a process, not a race. I have been slowly tweaking my own bathroom for two years, and I am just now feeling like it is “done” (well, for now).
Go forth and DIY! And hey, if you try any of these, I’d love to see how it turns out.
Pin this to your “Home Decor” board on Pinterest so you don’t lose these money-saving tips!