Hey there! I am so glad you’re here because hosting a baby shower is such a big deal. Did you know that over 80% of guests feel more “at home” the second they see a personalized greeting at the door? It’s like a warm hug before they even grab a cupcake!
I remember my first time helping my sister with her party, and we totally forgot the sign. People were wandering into the neighbor’s backyard! That’s why these 7 baby shower welcome sign ideas are so important for your 2026 event. Let’s dive into some crafty, sweet ways to make sure your friends and family feel special right away.

1. The Rustic Reclaimed Wood Board

Listen, I have a confession to make about wood signs. When I first tried to make one for my cousin Sarah’s party, I thought I was being real smart. I went behind the local grocery store and grabbed some old pallet wood from a trash pile. Big mistake! That wood was full of tiny spiders and gave me the worst splinters of my life. I spent more time screaming and jumping around than I did actually painting that day. My wife still laughs about it every time we drive past that store.
Once I finally got some clean cedar from the hardware store, everything changed. There is something so warm and cozy about a wooden board. It makes a house feel like a home the second your guests walk up the driveway. You want to sand the board down until it is super smooth, almost like a kitchen table. It is the best way to make your 2026 baby shower feel rustic but still very clean and nice for photos.
Finding Your Perfect Wood
You don’t need to spend a ton of money on this part. Check your local hardware store for what they call “common board” or simple cedar planks. Cedar smells amazing and it holds up well if the weather gets a little damp or humid outside. Try to avoid wood that looks green or feels wet to the touch. If the wood is too “fresh,” the paint will peel right off in just a few hours. I usually look for pieces that have a few knots or dark lines in them. This adds character and makes the sign feel like it has a real story to tell the guests.
How to Get Perfect Lettering
I am honestly not much of an artist. If you saw my normal handwriting, you would think a chicken wrote it! But here is a trick I use that works every time. Print your “Welcome” message on regular printer paper first. Flip the paper over and rub a lead pencil all over the back side. Tape the paper to your wood and trace the letters with a pen. The lead transfers to the wood like magic! Then you just fill it in with white acrylic paint. It makes you look like a pro even if you can’t draw a straight line to save your life.
Setting the Scene Safely
When you put the sign out, lean it against a sturdy chair or a heavy wooden easel. I once had a sign blow over and land right in the middle of a tray of appetizers because I didn’t secure it well enough. Use a heavy rock or a sandbag behind the base if it’s a windy day. This keeps things safe for the kids running around and keeps your decor looking great all afternoon. A little bit of twine wrapped around the top can also give it that extra farmhouse feel that everyone loves right now.
2. Modern Clear Acrylic with Pressed Flowers

I have to tell you, these clear acrylic signs are probably my favorite trend for 2026. They have this really cool “floating” effect that makes your greeting look like it is just hanging in the air. When I first saw one at a fancy wedding, I thought it must have cost hundreds of dollars. But then I realized you can actually make these yourself for a lot less. It is a great way to make your baby shower look really high-end without blowing your entire budget on one piece of plastic.
The Trouble with Fresh Flowers
Let me give you some advice so you don’t end up crying over a pile of dead weeds like I did. Last summer, I tried to press my own flowers from my garden to put inside an acrylic frame. I thought I could just put them in a heavy book for two days and they would be perfect. Well, I was totally wrong! They turned into a brown, mushy mess that looked like old spinach. It even ruined the pages in my favorite dictionary.
If you want that bright, pretty look, just buy pre-dried flowers. You can find them at most craft stores or online herb shops. They keep their color much better and they won’t rot inside your sign. If you want pink roses or yellow daisies, the dried versions stay looking fresh for the whole party. It saves a lot of time and a whole lot of frustration. Plus, they stay flat, which is exactly what you need for this project.
Writing on the Surface
Writing on a clear surface is a little different than writing on wood. You really need a good quality paint pen. I prefer the white oil-based ones because they don’t smudge as easily as the water-based ones. Just a heads up: be careful with your sleeves! I have accidentally wiped off half of a “Welcome” message more times than I care to admit. It’s very annoying to have to start over when you are almost finished.
If you are nervous about your handwriting, here is a trick. Since the sign is clear, you can tape your printed design to the back of the acrylic. Then, you just trace the letters on the front. It is like being back in grade school using a tracing paper. It is super easy and it makes the sign look like a professional made it. You get that fancy calligraphy look without actually having to be an artist.
Setting the Stage
Because these signs are clear, they can sometimes “disappear” if the background is too busy or if the wall behind them is the same color as the ink. I like to put them on a gold or black metal easel to give them some contrast. If you place them in a spot with good lighting, the edges of the plastic will catch the light and glow a little bit. It looks amazing in photos! Just make sure there isn’t too much glare from a window, or your guests won’t be able to read the baby’s name when they walk in. Keeping it simple usually works best.
3. The Boho Macramé Hanging Sign

If you are going for that “free spirit” or “boho” vibe for your 2026 party, macramé is going to be your best friend. I am a huge sucker for texture. To me, it makes everything feel much more intentional and soft when people walk through the front door. It gives the whole entrance a very relaxed, “come on in and stay a while” feeling that you just can’t get from a flat piece of paper.
The Knotty Truth About DIY
I have to be honest with you—I once tried to learn how to tie all those fancy macramé knots by watching a quick video on my phone. I thought I could finish a whole hanging sign in twenty minutes. Well, I ended up with a giant ball of tangled yarn that looked more like a bird’s nest than a welcome sign! I felt like a total goof sitting on my living room floor surrounded by string.
Eventually, I figured out that you really only need to know a couple of basic knots to make something look good. The square knot is the big one you should practice. Once you get that down, you are basically golden. You can hang a little wooden plaque right in the middle of all that fringe. It looks so much more interesting than a regular frame because it has movement and life to it.
Picking the Right Colors for 2026
For the 2026 season, sage green and cream-colored ropes are super popular. I see them everywhere in home decor magazines lately. Instead of the bright white that was big a few years ago, people are moving toward these “earthy” tones. It makes the baby shower feel calm and peaceful. When you pick your rope, try to find 100% cotton. It is much softer on your hands while you are working, and it hangs a lot better than the cheap synthetic stuff.
A Sign That Lives On
One of the best things about this idea is that it is not just for the party day. After the baby shower is over, the new mom can hang it right on the nursery wall! I love decor that doesn’t just end up in a cardboard box in the attic or, even worse, in the trash can. It becomes a sweet memory of the day everyone gathered to celebrate the new little one.
Here is a quick pro-tip I learned the hard way: use a regular hair comb to brush out the fringe at the very bottom of the sign. It makes the rope look fluffy and way more professional. If you leave the ends all twisted and tangled, it looks a bit messy. Taking those extra five minutes to brush it out makes the whole thing look like it came from a fancy boutique. It’s those tiny details that really make the sign pop for your guests.
4. Vintage Mirror with Chalkboard Markers

Thrifting is basically my favorite weekend sport. There is nothing quite like the rush of finding a dusty old mirror with a big, chunky frame hiding in the back of a garage sale. I actually found a massive one last month for only five dollars! It was covered in some weird old stickers and a layer of grime that looked like it had been there since 1995. But I knew that with a little bit of glass cleaner and some elbow grease, it would look like something out of a royal palace.
Using a vintage mirror is one of the smartest ways to handle a baby shower welcome sign. Guests absolutely love it because they can check their hair and makeup the second they walk through the door. It is the ultimate “outfit check” spot for selfies. If you want people to start posting photos of your party on social media right away, this is the way to perform that trick. It adds a touch of class and whimsy that is hard to beat with just a regular poster board.
Scoring a Great Thrift Store Find
When you are looking for a mirror at a thrift shop, don’t be scared of an ugly color on the frame. You can always buy a cheap can of spray paint and turn a puke-green frame into a beautiful gold or matte black one in about ten minutes. Focus on the shape and the size. You want something big enough that people can see their whole face and shoulders. Also, check to make sure the glass isn’t too scratched up. A few little marks are fine and add to the “vintage” look, but you don’t want a huge crack running through the middle of the baby’s name!
Writing Clearly on Glass
Talking about writing on the glass, you really have to use liquid chalk markers. Please do not try to use regular school chalk that you’d use on a sidewalk. It won’t show up at all, and it will just look like a blurry mess. I made that mistake once for a dinner party and nobody could even read what we were eating! Liquid chalk goes on wet and dries into a bright, crisp line.
I also have a funny tip for you: don’t write on the mirror while it is lying flat on your kitchen table. I did that once and I thought I was doing a great job. But as soon as I stood the mirror up on the easel, I realized all my sentences were slanted downhill! It looked like the words were trying to slide off the glass. Now, I always prop the mirror up at the exact angle it will be at the party before I start my calligraphy. It saves me from having to wash the whole thing and start over.
Watch What the Mirror Sees
One thing people often forget is that a mirror shows whatever is behind the person looking at it. I once saw a beautiful welcome mirror placed right across from a stack of messy trash bags that the caterers had left out. Every single photo people took had a reflection of garbage in the background! It totally ruined the vibe.
Before you settle on a spot, stand where the guests will stand and look at what is reflecting in the glass. You want it to show off your decorations, some flowers, or maybe a nice tree if the party is outside. If you see something ugly in the reflection, just shift the mirror a few inches to the left or right. It is a simple fix that makes a huge difference in how the entry looks. This helps make the space feel bigger and much more bright for everyone arriving at the celebration.
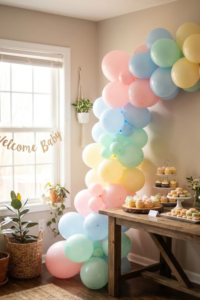
5. Whimsical Balloon Arch Frame

Balloons are basically the universal sign for “hey, something fun is happening here!” I have a bit of a love-hate relationship with them, though. I remember the first time I tried to make one of those fancy organic balloon arches for my neighbor’s shower. I thought I could just blow them all up to the same size and tape them to the wall. It looked like a bunch of grapes that had a very bad day. I felt so embarrassed when the guests arrived and saw my sad little balloon pile drooping off the side of the welcome sign.
But once you figure out the trick, this is one of the most high-impact options in our list of 7 baby shower welcome sign ideas. It creates a massive “wow” factor that makes people stop and take photos before they even say hello. For 2026, we are seeing a shift away from the shiny, bright primary colors and moving more toward matte, soft tones. Think of colors like sage green, dusty rose, or a very pale “cloud” blue. These colors look much more expensive and grown-up, which is exactly the vibe most moms-to-be are looking for these days.
The Secret to the “Organic” Look
The big secret to making these look like they were done by a professional planner is using different sizes of balloons. You want some that are giant, some that are medium, and a bunch of teeny-tiny ones to fill in the gaps. I call it the “bubble effect.” When you mix the sizes, it looks natural and flowing rather than stiff and boring. You can buy a plastic balloon strip at the craft store for a couple of bucks that makes it super easy to attach them all together. Just pull the knotted ends through the holes, and you have an instant arch!
Location Matters for Longevity
One big lesson I learned the hard way: never put your balloon sign in the direct afternoon sun. I did that for a garden party once, and about twenty minutes after I finished, the balloons started popping like a string of firecrackers! It was so loud it actually made the poor grandma-to-be jump out of her seat. The heat makes the air inside expand, and “pop”—there goes your hard work.
If your party is outside, try to find a shady spot under a porch or a big tree for your sign. If you have to be in the sun, under-inflate the balloons just a little bit so they have room to stretch. This keeps your welcome area looking full and festive for the whole afternoon. It is a simple thing, but it saves you from a lot of stress and noise later on. Plus, a shaded sign is much easier for people to read without squinting!
6. Minimalist Foam Board with Custom Typography

Sometimes people think they have to go crazy with flowers and wood and glitter to make a big statement. But I have learned over the years that sometimes, “less is more” is actually the best way to go for a party. A clean, white foam board can look incredibly sharp if you do it right. It is all about picking a great font. If you find a beautiful, modern font, that sign is going to do all the hard work for you without needing a bunch of extra stuff glued to it. It is one of those 7 baby shower welcome sign ideas that really saves you a ton of time and stress.
The Canva and Printer Struggle
I will tell you right now, I use a website called Canva for almost every party I host these days. It is so easy that even I can figure it out, and I am not exactly a computer genius. You just type in the baby’s name, pick a font that looks “fancy,” and you are basically halfway there. But let me give you a piece of advice I learned from a very stressful Tuesday afternoon a few years back. Do NOT try to print a large sign on your home printer by taping together twelve pieces of paper. I tried that for a friend’s brunch and it looked like a kindergarten project gone wrong. Plus, my printer ran out of black ink halfway through, so the bottom of the sign was a weird shade of gray.
It is much better to save your file on a thumb drive and send it to a local print shop. They can print it directly onto a thick foam board for you. It usually only costs about twenty or thirty bucks, and it looks a million times better than anything you can do at home. You won’t have to deal with paper jams or ink smudges on your fingers. It is worth the few extra dollars to have it look clean and professional for your guests.
Dealing with the Wind
Foam board is super light, which is great because you can carry it under one arm while you are holding a tray of cupcakes in the other. But that lightness can also be a total nightmare if the party is outside. One time, I set up a beautiful minimalist sign on a tripod in the front yard. A big gust of wind came out of nowhere and that sign took off like a giant white frisbee! It almost hit a neighbor’s dog and ended up face-down in a mud puddle. I felt so silly running down the street chasing a piece of foam.
To keep your sign from flying away, you need to be a little bit sneaky. I usually tape a few heavy metal washers or even some small, flat rocks to the back of the board near the bottom. You can also use heavy-duty Velcro to stick the board to your easel so it doesn’t slide around. You don’t want your welcome sign becoming a flying hazard or a weapon during the party. A little bit of extra weight goes a long way in keeping things where they belong.
Keeping it Simple and Clean
The best part about this style is how budget-friendly it is. If you are spending all your money on the fancy cake and the expensive guest favors, this is a great place to save some cash. It looks high-end because it is so clean and modern, but it doesn’t cost much to pull off. And honestly, your guests just want to know they are at the right house and feel welcomed! A clear, simple sign is the best way to greet them without overwhelming them the second they step out of their car. It keeps the focus on the celebration and the new baby, which is what the day is all about anyway.
7. The Living Wreath Welcome Sign

I saved the best for last. To be honest, there is nothing quite like the smell of fresh eucalyptus when you walk onto a porch. It makes the whole entryway feel like a fancy spa. I started making these living signs a few years ago for my friends, and now I just can’t stop. It is basically a big green wreath with a small wooden sign floating right in the middle. It is such a classy way to say hello to your friends and family as they arrive. For 2026, people are really moving away from plastic and back to things that grow in the dirt.
Choosing Your Greenery
You can buy a plain wreath base at the craft store and just tuck the branches in yourself. It doesn’t have to be perfect. In fact, it looks better if it is a little bit wild and “un-done.” I once tried to make a wreath that was perfectly symmetrical and even on both sides. I spent three hours on it! When I was finished, it ended up looking like a giant green donut. My kids even asked me where the sprinkles were. Don’t be like me and overthink it. Just let the leaves go where they want to go naturally. Boxwood or eucalyptus are great choices for this year because they stay green for a long time without needing much water.
Attaching Your Sign
You will need a little bit of floral wire to attach your wooden sign to the wreath frame. This part can be a bit tricky if you have clumsy fingers like I do. I usually poke two small holes in the top of the wooden plaque and loop the wire through. Then, you just twist it onto the wire frame of the wreath. Make sure you tuck the sharp ends of the wire back so they don’t scratch your front door. I learned that lesson the hard way and had to repaint my own door last summer! It was a lot of extra work that I could have avoided with just a little bit of tape.
Why Fresh is Best for 2026
This idea is very eco-friendly, which is a big trend for parties this year. Plus, eucalyptus dries out really nicely. So even after the party is over, the sign will still look good on your wall for weeks. It is a beautiful way to welcome a new little life into the world. It’s soft, it’s green, and it’s just plain lovely. It smells a thousand times better than a plastic sign and gives people a great first impression of your home. It makes the whole house feel fresh and ready for a celebration.
Conclusion
Choosing the right welcome sign sets the whole mood for your big day. Whether you go for the rustic wood or the fancy mirror, your guests are going to love it! It is the very first thing they see, so making it special is worth the effort. Don’t forget to take a photo of your finished creation before the party starts. If you loved these 7 baby shower welcome sign ideas, please share this post on Pinterest so other moms-to-be can find some inspiration too!