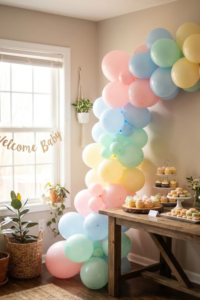
Honest truth? The moment I walk into a party, I judge the vibe immediately! It sounds harsh, but we all do it. The first thing your guests see sets the tone for the entire day, and that is exactly why nailing your entrance decor is non-negotiable.
“You never get a second chance to make a first impression,” as the old saying goes, and it holds up perfectly for event styling. Whether you are planning a cozy backyard gathering or a high-end venue celebration, 7 baby shower sign ideas can transform a simple doorway into a grand entrance. I’ve scoured the trends for 2026 to bring you styles that range from effortless DIYs to sophisticated custom pieces. Let’s get that “wow” factor started!

1. The Timeless Rustic Chalkboard Sign

There is something so comforting about a chalkboard. Maybe it’s just the teacher in me, but seeing that dusty black or green background with fresh white lettering always feels warm and inviting. It is a classic choice for a reason. You really can’t go wrong with it, especially if you are aiming for that farmhouse or rustic look that everyone seems to love right now.
The best part about going with a chalkboard sign is that it is super forgiving. If you mess up a letter or center it wrong, you just grab a wet rag and wipe it away. No wasted paper, no ruined expensive foam boards. Just a clean slate, literally.
Why Your Wallet Will Thank You
Let’s be real for a second—parties get expensive. Between the food, the favors, and the cake, the budget disappears fast. Chalkboards are one of the most budget-friendly options out there. You might even have an old mirror or picture frame sitting in your garage right now.
You can pop out the glass or paint right over it with chalkboard spray paint. A can costs like five bucks at the hardware store. Once the baby shower is over, you don’t have to throw it away. You can clean it off and use it for the kid’s first birthday party or just hang it in your kitchen for grocery lists. It serves a purpose way longer than just one afternoon.
You Don’t Need Perfect Handwriting
I hear this all the time: “But my handwriting looks like chicken scratch!” Listen, you do not need to be a professional calligrapher to make this look good. There is a simple trick I use in my classroom for bulletin boards that works perfectly here.
Print out your words on regular computer paper in a font you like. Rub chalk all over the back of the paper. Tape the paper onto the board and trace the letters with a pencil. When you pull the paper away, you’ll have a faint chalk outline that you can trace over with a chalk marker. It looks professional every single time, and nobody needs to know you traced it.
Dressing It Up
A chalkboard on its own can look a little plain, so you have to accessorize it. To really make it pop, I like to drape some greenery over the top corner. Eucalyptus garland is great because it dries nicely and doesn’t wilt in the sun if your party is outside.
Don’t forget the bottom of the easel, either. It looks awkward if the sign is just floating there on spindly legs. I usually stack a couple of wooden crates or place a vintage lantern at the base to weigh it down visually. It grounds the whole look and makes your entrance feel complete.
2. Modern Minimalist Acrylic Stands

If the rustic chalkboard is the comfortable sweater of baby shower decor, the acrylic sign is definitely the sharp new blazer. You have probably seen these all over Instagram lately. They look just like glass, but they are actually plastic, which means you don’t have to worry about them shattering into a million pieces if someone accidentally bumps into the easel. As a teacher who is always worried about safety, that is a huge plus in my book.
This style is super popular for 2026 because it looks so clean. Since the sign is see-through, it doesn’t block the view of anything behind it. If you have a beautiful garden or a cool balloon arch, the sign just blends right in without fighting for attention.
The “Ghost” Look vs. The Painted Back
You basically have two main choices here. The first is the “ghost” look, where you leave the background completely clear. This is great for a very modern, minimal feel. But my personal favorite technique is painting the back. It adds a pop of color that matches your theme without looking cluttered.
Here is the trick: you paint on the back side of the acrylic, not the front. You want to use bold, messy brush strokes in the center where the words will go. Don’t try to make it a perfect square; the rough edges of the paint look artsy and cool. Since you are painting the back, when you flip it over to look at the front, the surface is still perfectly smooth and shiny. It looks way more professional than it actually is. Any cheap craft paint works fine for this, so don’t feel like you need the expensive stuff.
Getting the Letters on Straight
Now, how do you get the words on there? If you have a steady hand, you can use a white oil-based marker. But if you want it to look like it came from a store, vinyl is the way to go.
I use a Cricut machine in my classroom for labeling bins, and it works wonders for these signs too. You just cut out “Welcome Baby” in white or gold vinyl and stick it on the front. If you don’t own a cutting machine, don’t stress. You can actually order custom vinyl decals on Etsy for a few dollars. They send you the sticker, and you just rub it onto your acrylic sheet.
Don’t Forget the Stand
One thing people often forget is how to hold these things up. Because they are usually thinner than a wood board, they can slide right off a regular easel. I recommend using a specific table-top stand—usually, they look like two little wooden blocks or a metal slot that holds the bottom edge.
If you are using a big floor easel, just put a little piece of double-sided tape or that sticky blue tack on the ledge of the easel. It keeps the acrylic sheet from sliding forward and crashing down in the middle of the party. It’s a small detail, but it saves you a lot of embarrassment!
3. Elegant Mirror Welcome Signs

If you want your party to feel fancy without actually spending a fortune, a mirror sign is the way to go. It brings this instant touch of class to the room. In the classroom, we use mirrors to make small spaces feel bigger, and the same trick applies to your venue. It reflects the light and makes the whole entrance feel open and airy.
Plus, let’s be honest, everyone loves looking at themselves. If you put a mirror at the entrance, I guarantee your guests are going to stop, check their hair, and snap a selfie before they even say hello to you. It basically doubles as a photo booth, which is a nice bonus.
The Thrift Store Treasure Hunt
Please, do not go out and buy a brand new mirror for this. Mirrors are expensive! As a teacher on a budget, I love a good thrift store run. You can almost always find a mirror with a cool, vintage frame at a Goodwill or a yard sale for ten or twenty bucks.
Don’t worry if the frame is an ugly color. I found one once that was a terrible 90s fake wood color, but the shape was beautiful. I took it into the backyard, gave it two coats of gold spray paint, and it looked like something from a royal palace. Just look for “good bones” or a nice shape; you can fix the rest with paint.
Writing on Glass Without the Mess
Writing on a mirror is actually easier than writing on a chalkboard because the surface is so smooth. You want to use a liquid chalk marker or a white window marker. Do not use a regular permanent marker, or you will ruin the glass!
Here is a tip I learned the hard way: clean the mirror with glass cleaner before you start writing. If there is dust or fingerprints on it, the marker won’t stick smoothly, and your letters will look streaky. Also, keep some cotton swabs handy. If you make a mistake on a letter, just get the swab wet and wipe away the little error. It allows you to fix tiny details without erasing the whole word.
Safety First (The Teacher in Me)
I have to bring up safety because mirrors are heavy. A cheap, flimsy aluminum easel will not hold a heavy vintage mirror. It will topple over, and then you have seven years of bad luck and broken glass at your baby shower. Nobody wants that.
Make sure you use a heavy-duty iron easel or lean the mirror securely against a wall or a sturdy tree if you are outside. Also, check what the mirror is reflecting! You don’t want your beautiful “Welcome Baby” sign reflecting the garbage cans or the bathroom door. Stand where your guests will stand and check the view before you walk away.
4. Wooden Pallet and Boho Florals

If you are going for that relaxed, earthy vibe, you really need to look at wooden pallets. This style has been a favorite for a few years now, and it is not going anywhere in 2026. It fits perfectly with those “wildflower” or “little pumpkin” themes. It feels grounded and warm, unlike the shiny acrylic or fancy mirrors. It says, “Come in, relax, and stay a while.”
As a teacher, I love reusing things that would otherwise go to the trash. Pallets are often free if you know where to look. Small local businesses or garden centers will sometimes let you take them off their hands just to save them a trip to the dump. Just ask nicely!
The Hunt for the Perfect Pallet (And Prepping It)
Now, you can’t just grab a dirty old pallet from behind a dumpster and stick it at your front door. You have to be careful. Some of them are treated with strong chemicals. Look for a stamp that says “HT” (Heat Treated) rather than chemicals. That is the safe kind.
Also, please sand it down! I cannot stress this enough. Nothing ruins a party faster than a guest getting a nasty splinter in their nice dress or, heaven forbid, their hand. Grab some coarse sandpaper and give it a good scrub. If the wood looks too light or new, a quick coat of dark wood stain makes a huge difference. It makes the white lettering pop so much better than on raw, light wood.
Adding the “Pop” with 3D Letters
For the words, you could paint them on, but painting on rough wood is really hard. The paint bleeds into the cracks, and it looks messy.
Instead, I recommend buying wooden letters from a craft store. You can spray paint the letters white or gold and then hot glue them directly onto the pallet slats. This gives the sign a 3D effect that looks way more expensive than it is. It creates shadows and depth that you just can’t get with a paintbrush.
Why Dried Flowers are a Lifesaver
The “boho” part usually comes from the flowers you attach to the corners. My best advice? Use dried flowers or pampas grass. Fresh flowers are beautiful, but they are stressful. They wilt if it is hot, and they need water tubes.
Dried florals can be stapled onto the wood three days before the party, and they will look exactly the same when the guests arrive. Pampas grass adds that fluffy, soft texture that softens the hard look of the wood. Just use a staple gun to attach the stems securely to the wood—wire or tape usually isn’t strong enough to hold them up against the wind.
5. Hanging Fabric or Linen Banners

Sometimes you just want something that feels a little softer. Hard signs made of wood or acrylic are great, but they can feel a bit rigid. A fabric banner has movement. When the wind blows a little bit, it flutters, and it just looks so dreamy and romantic. If you are planning a garden party or something with a “cottage core” theme, this is the one I would pick.
As a teacher, I am always looking for materials that are easy to store. The best thing about a fabric sign is that when the party is over, you just fold it up. It takes up zero space in your closet compared to a giant wooden pallet.
You Don’t Need Fancy Linen
You might see these on Pinterest and think you need to go to a high-end fabric store to buy expensive linen. You really don’t. My favorite secret weapon is the hardware store.
Go to the painting aisle and buy a canvas drop cloth. Yes, the kind you put on the floor when you paint walls. It costs almost nothing, and it has that perfect, oatmeal-colored, natural look. Just make sure you wash it and dry it first. That softens up the stiff fabric and gives it that wrinkled, organic texture that looks so high-end. You can cut it to whatever size you need, and you don’t even have to hem the edges. A little bit of fraying at the bottom actually adds to the charm.
Getting the Words on Fabric
Writing on fabric can be tricky because it moves around. If you try to paint it with a brush, the fabric soaks up the paint and the edges get fuzzy. It can look messy fast.
I tell parents to use iron-on vinyl if they have a cutting machine. It looks crisp and stays put. If you don’t have one, just use a wide-tip fabric marker and a stencil. Tape the stencil down tight so it doesn’t shift. It is much easier to control a marker than a paintbrush on this material.
The Copper Stand Hack
Now, you can’t exactly lean a piece of fabric against a tree. You need something to hang it from. The trendy look for 2026 is the copper pipe stand. It sounds industrial, but when you pair that shiny rose-gold metal with the soft fabric, it looks beautiful.
You can build one easily with pipes from the plumbing aisle. You don’t need any tools; the pieces just fit together with elbow joints. If that feels like too much work, just get a nice wooden dowel or a sturdy branch from your yard. Tie a string to both ends of the branch and hang it from a hook on the front door. It is simple, welcoming, and totally totally doable for a beginner.
6. Neon Light Statements

If you want your party to feel like a real celebration from the second people walk in, neon is the answer. It instantly shifts the mood from “afternoon tea” to “party time.” In 2026, we are seeing these used less as just a welcome sign and more as the main attraction. It’s the spot where every single guest is going to want a photo with the mom-to-be.
As a teacher, I’m used to fluorescent classroom lights that hum and give you a headache. These aren’t like that. Modern neon signs use “LED flex,” which is a soft, warm glow that looks amazing in photos. Plus, unlike the old-school neon beer signs in bars, these aren’t made of glass. They are silicone or plastic. That means they won’t shatter if a kid runs into them, which is a huge relief for anyone hosting a family event.
To Rent or To Buy?
Here is the big question I always get asked: “Should I buy one with the baby’s name?”
My advice? Only buy a custom name sign if you plan to hang it in the nursery afterwards. Custom signs can cost hundreds of dollars. If you are on a budget, just rent a generic “Oh Baby” or “Better Together” sign from a local event rental company. You can usually get one for the day for about $50 or $60. It gives you that high-end look without the high-end price tag, and you don’t have to figure out where to store it later.
You Need a Background
You can’t really just hang a neon sign on a blank wall; it looks a little lonely. It needs a backdrop to make the light pop. The most popular choice right now is a greenery wall or a “hedge wall.” The dark green leaves make the white or pink light stand out perfectly.
If a hedge wall is too much work, a simple gold metal grid works too. You can zip-tie the sign right onto the grid. It’s lightweight and easy to move around.
The “Ugly Cord” Problem
Here is the one thing nobody thinks about until the day of the party: the power cord. These signs need electricity! I have been to so many showers where there is a beautiful sign, and then an ugly bright orange extension cord snaking across the floor. It ruins the whole vibe (and it’s a tripping hazard!).
Make sure you place your sign near an outlet. If you can’t, tape down the extension cord with gaffer tape so nobody trips, and try to hide the sign’s power brick behind the greenery or balloons. A little bit of planning saves a lot of headaches later.
7. Digital Printable on Foam Board

We have all been there. The party is in three days, you have been so busy planning the food and the games that you completely forgot about the decor. You need something fast, but you don’t want it to look fast. This is where digital printables save the day. It is basically the procrastinator’s best kept secret.
I use printables for my classroom bulletin boards all the time, and the process for a baby shower is exactly the same. You don’t have to wait for shipping. You just buy a file online, and it sits in your email inbox five minutes later. It is magic.
The Etsy Rabbit Hole
If you go on sites like Etsy, you can find a design for literally any theme you can dream of. Safari animals, watercolor flowers, little pumpkins—it is all there. Most of the time, these files cost less than ten dollars.
The best part is that many of them are editable. You can open the file on your computer and type in the mom’s name or the due date yourself. You don’t have to wait for a designer to get back to you. Just make sure you spell-check everything three times! I once printed a banner that said “Welocme” instead of “Welcome” because I was rushing. Don’t be like me.
Why Regular Paper Won’t Work
Here is the most important part: do not just print this on a piece of printer paper and tape it to the wall. It will look like a lost dog flyer. You need it to be rigid so it can stand up on an easel.
When you send the file to a place like Staples, Office Depot, or FedEx, ask them to print it on “foam board” or “foam core.” It costs a little more than a regular poster, but it is thick and sturdy. It looks like a real sign that you bought at a store. If you just print a flimsy poster, it will curl up in the humidity and flop over.
The Teacher Budget Hack
If the print shop wants to charge you forty dollars for a foam board print and that hurts your wallet, here is a little DIY trick I use for school projects.
Just print the design as a regular “blueprint” or “engineering print” (these are super cheap, usually just a few bucks for a huge size). Then, go to the Dollar Store and buy a white foam board for $1.25. Use a can of spray adhesive to glue your paper onto the board. Smooth it out with a credit card so there are no bubbles. If you do it carefully, nobody will ever know you didn’t pay for the professional mounting.
Watch Your Sizes
Before you hit “print,” check the size of your easel! I usually tell people to stick to standard sizes like 18×24 inches or 24×36 inches. If you go too small, the sign looks sad and tiny on a big easel. If you go too big, the wind might catch it like a sail. 18×24 is usually the “Goldilocks” size—just right for welcoming guests without taking over the whole entrance.
Conclusion
At the end of the day, picking a sign is just one small part of the celebration, but it is the first thing people see. You want them to walk up and immediately feel the love you are putting into this new baby. Whether you grab a piece of scrap wood from the garage or rent a flashy neon light, the result is the same: you are welcoming family and friends to share in a really special moment.
Don’t stress too much about making it “Instagram perfect.” Some of the best parties I have been to had signs made with Crayola markers and a whole lot of heart. Just pick the one that fits your budget and your style, and have fun with it. The most important thing is that the mom-to-be feels celebrated.
Pin this article to your Baby Shower board on Pinterest! You are going to want to save these ideas for later. Trust me, when the party date gets closer and your brain is scrambled with cake flavors and guest lists, you will be glad you have this list saved right where you can find it. Just hit the “Save” button so you don’t lose it!